» Download this section as PDF (opens in a new tab/window)
Nutanix Guest Tools (NGT) is a software-based in-guest agent framework that enables advanced VM management functionality through the Nutanix Platform.
The solution is composed of the NGT installer which is installed on the VMs and the Guest Tools Framework which is used for coordination between the agent and Nutanix platform.
The NGT installer contains the following components:
This framework is composed of a few high-level components:
The following figure shows the high-level mapping of the components:
 Guest Tools Mapping
The Guest Tools Service is composed of two main roles:
You can find the IP of the CVM hosting the NGT Leader role with the following command (run on any CVM):
nutanix_guest_tools_cli get_leader_location
The figure shows the high-level mapping of the roles:
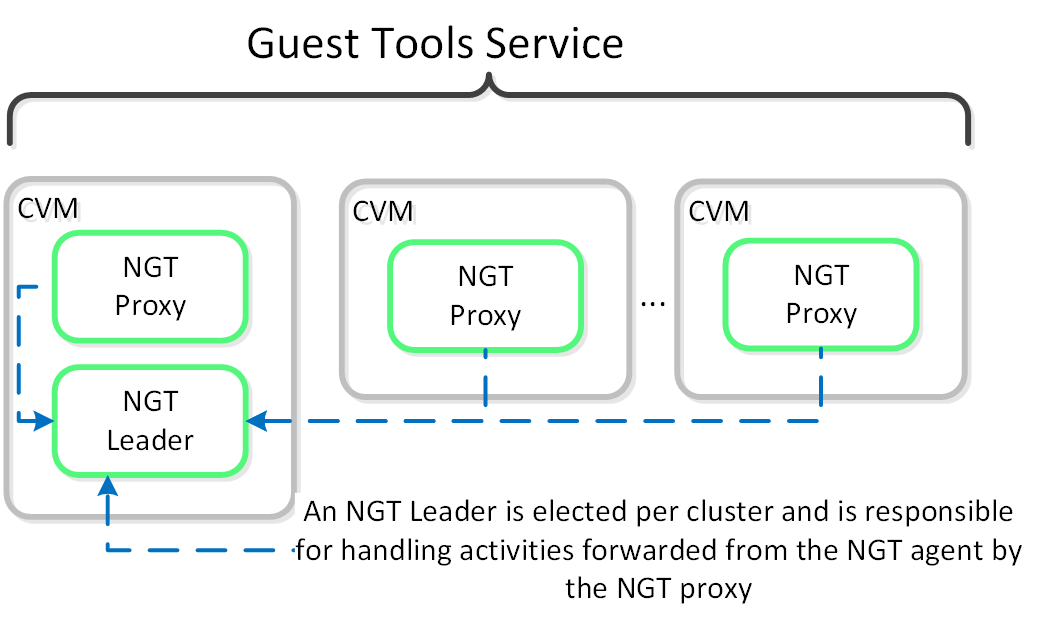 Guest Tools Service
The Guest Agent is composed of the following high-level components as mentioned prior:
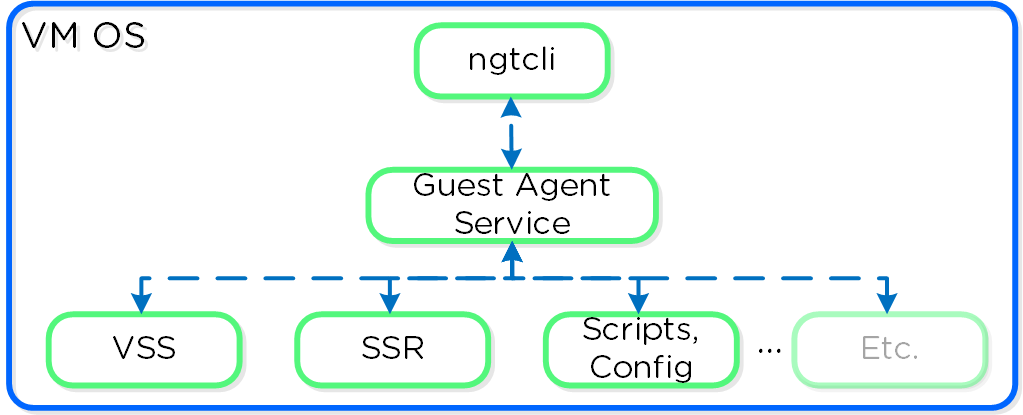 Guest Agent
The Guest Agent Service communicates with the Guest Tools Service via a serial port connection from VM to the CVM. If the service is unable to reach the CVM via serial port it will fail back to a network connection to the Nutanix Cluster VIP using SSL. For deployments where the Nutanix cluster components and UVMs are on a different network (hopefully all), ensure that the following are possible to allow this fallback communication method:
OR
The Guest Tools Service acts as a Certificate Authority (CA) and is responsible for generating certificate pairs for each NGT-enabled UVM. This certificate is embedded into the ISO which is configured for the UVM and used as part of the NGT deployment process. These certificates are installed inside the UVM as part of the installation process.
NGT Agent installation can be performed via Prism, install packages, or CLI and scripts such as nCLI, REST, or PowerShell. The install packages are available in .exe (Windows), .rpm and .deb (Linux) formats and are available on the Nutanix support portal. These installers can be installed manually, via scripts, or 3rd party tools. The 3rd party tool method enables NGT installation at scale utilizing existing tools.
Rather than installing NGT on each VM, you can use the install packages mentioned earlier or embed and deploy NGT in your base image. Use the NGT Bulk Install instructions for packaged deployment.
Use the following process to leverage NGT inside a base image:
When the cloned VM is booted, it will detect the new NGT ISO, copy relevant configuration files and new certificates, and start communicating with the Guest Tools Service.
Nutanix provides native OS customization capabilities leveraging CloudInit and Sysprep. CloudInit is a package which handles bootstrapping of Linux cloud servers. This allows for the early initialization and customization of a Linux instance. Sysprep is a OS customization for Windows.
Some typical uses include:
The solution is applicable to Linux guests running on AHV, including versions below (list may be incomplete, refer to documentation for a fully supported list):
In order for CloudInit to be used the following are necessary:
Sysprep is available by default in Windows installations.
CloudInit can be installed (if not already) using the following commands:
Red Hat Based Systems (CentOS, RHEL)
yum -y install CloudInit
Debian Based Systems (Ubuntu)
apt-get -y update; apt-get -y install CloudInit
Sysprep is part of the base Windows installation.
To leverage a custom script for OS customization, a check box and inputs is available in Prism or the REST API. This option is specified during the VM creation or cloning process:
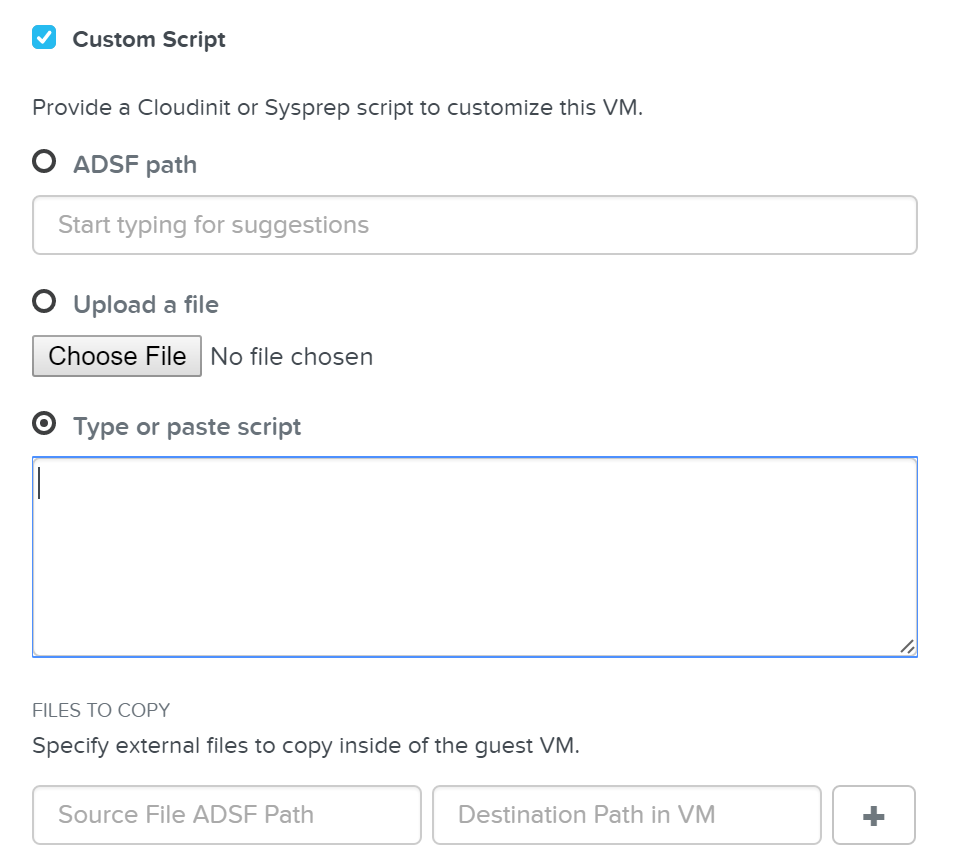 Custom Script - Input Options
Nutanix has a few options for specifying the custom script path:
Nutanix passes the user data script to CloudInit or Sysprep process during first boot by creating a CD-ROM which contains the script. Once the process is complete we will remove the CD-ROM.
The platform supports a good amount of user data input formats. Some of the key formats are outlined below:
A user-data script is a simple shell script that will be executed very late in the boot process (e.g. “rc.local-like”).
The scripts will begin similar to any bash script: “#!”.
Below we show an example user-data script:
#!/bin/bash
touch /tmp/fooTest
mkdir /tmp/barFolder
The include file contains a list of urls (one per line). Each of the URLs will be read and they will be processed similar to any other script.
The scripts will begin with: “#include”.
Below we show an example include script:
#include
http://s3.amazonaws.com/path/to/script/1
http://s3.amazonaws.com/path/to/script/2
The cloud-config input type is the most common and specific to CloudInit.
The scripts will begin with: “#cloud-config”
Below we show an example cloud config data script:
#cloud-config

# Set hostname
hostname: foobar

# Add user(s)
users:
 - name: nutanix
 sudo: ['ALL=(ALL) NOPASSWD:ALL']
 ssh-authorized-keys:
 - ssh-rsa: PUBKEY
 lock-passwd: false
 passwd: PASSWORD

# Automatically update all of the packages
package_upgrade: true
package_reboot_if_required: true

# Install the LAMP stack
packages:
 - httpd
 - mariadb-server
 - php
 - php-pear
 - php-mysql

# Run Commands after execution
runcmd:
 - systemctl enable httpd
CloudInit log files can be found in /var/log/cloud-init.log and cloud-init-output.log.
The unattend.xml file is the input file Sysprep uses for image customization on boot, you can read more here: LINK
The scripts will begin with: “<?xml version=”1.0” ?>”.
Attached is an example unattend.xml file
Nutanix provides the ability to leverage persistent containers on the Nutanix platform using Kubernetes (currently). It was previously possible to run Docker on Nutanix platform; however, data persistence was an issue given the ephemeral nature of containers.
Container technologies like Docker are a different approach to hardware virtualization. With traditional virtualization each VM has its own Operating System (OS) but they share the underlying hardware. Containers, which include the application and all its dependencies, run as isolated processes that share the underlying Operating System (OS) kernel.
The following table shows a simple comparison between VMs and Containers:
| Metric | Virtual Machines (VM) | Containers |
|---|---|---|
| Virtualization Type | Hardware-level virtualization | OS kernel virtualization |
| Overhead | Heavyweight | Lightweight |
| Provisioning Speed | Slower (seconds to minutes) | Real-time / fast (us to ms) |
| Performance Overhead | Limited performance | Native performance |
| Security | Fully isolated (more secure) | Process-level isolation (less secure) |
The solution is applicable to the configurations below (list may be incomplete, refer to documentation for a fully supported list):
Hypervisor(s):
Container System(s)*:
*As of 4.7, the solution only supports storage integration with Docker based containers. However, any other container system can run as a VM on the Nutanix platform.
The following entities compose Karbon Container Services:
The following entities compose Docker (note: not all are required):
The Nutanix solution currently leverages Docker Engine running in VMs which are created using Docker Machine. These machines can run in conjunction with normal VMs on the platform.
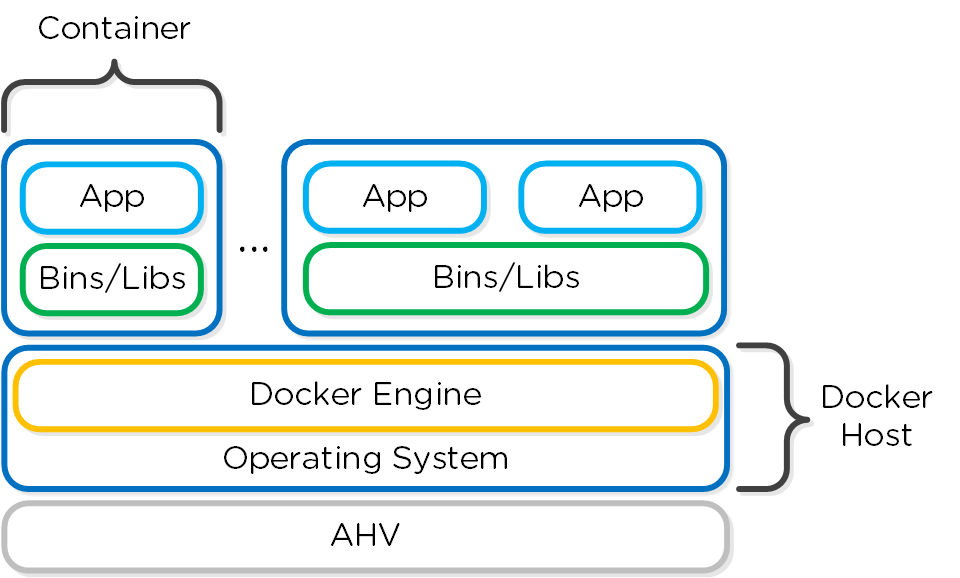 Docker - High-level Architecture
Nutanix has developed a Docker Volume Plugin which will create, format and attach a volume to container(s) using the AOS Volumes feature. This allows the data to persist as a container is power cycled / moved.
Data persistence is achieved by using the Nutanix Volume Plugin which will leverage AOS Volumes to attach a volume to the host / container:
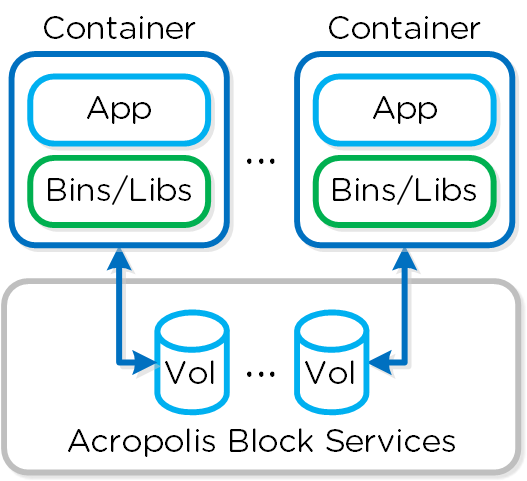 Docker - Volumes
In order for Container Services to be used the following are necessary:
Assuming all pre-requisites have been met the first step is to provision the Nutanix Docker Hosts using Docker Machine:
docker-machine -D create -d nutanix \
--nutanix-username PRISM_USER --nutanix-password PRISM_PASSWORD \
--nutanix-endpoint CLUSTER_IP:9440 --nutanix-vm-image DOCKER_IMAGE_NAME \ --nutanix-vm-network NETWORK_NAME \
--nutanix-vm-cores NUM_CPU --nutanix-vm-mem MEM_MB \
DOCKER_HOST_NAME
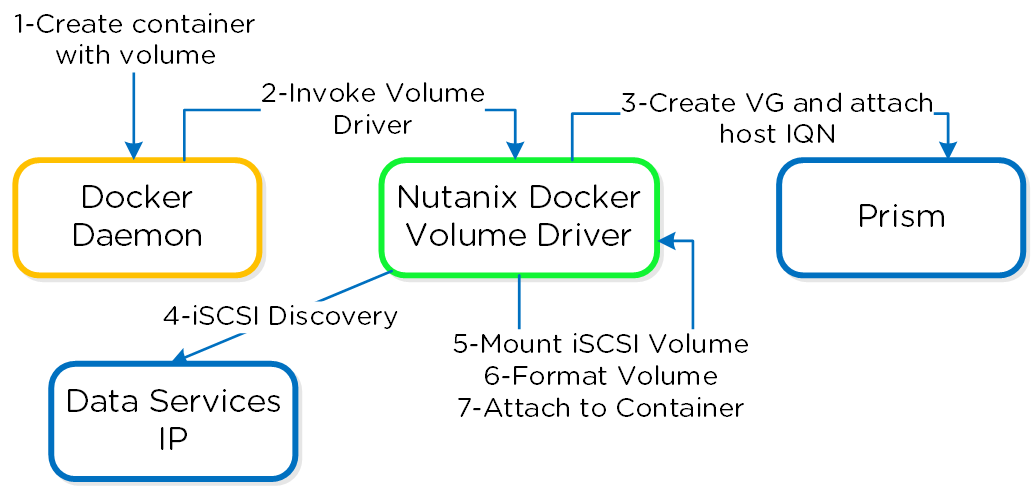
The following figure shows a high-level overview of the backend workflow:
 Docker - Host Creation Workflow
The next step is to SSH into the newly provisioned Docker Host(s) via docker-machine ssh:
docker-machine ssh DOCKER_HOST_NAME
To install the Nutanix Docker Volume Plugin run:
docker plugin install ntnx/nutanix_volume_plugin PRISM_IP= DATASERVICES_IP= PRISM_PASSWORD= PRISM_USERNAME= DEFAULT_CONTAINER= --alias nutanix
After that runs you should now see the plugin enabled:
[root@DOCKER-NTNX-00 ~]# docker plugin ls
ID Name Description Enabled
37fba568078d nutanix:latest Nutanix volume plugin for docker true
Once the Nutanix Docker Host(s) have been deployed and the volume plugin has been enabled, you can provision containers with persistent storage.
A volume using the AOS Volumes can be created using the typical Docker volume command structure and specifying the Nutanix volume driver. Example usage below:
docker volume create \
VOLUME_NAME --driver nutanix

Example:
docker volume create PGDataVol --driver nutanix
The following command structure can be used to create a container using the created volume. Example usage below:
docker run -d --name CONTAINER_NAME \
-p START_PORT:END_PORT --volume-driver nutanix \
-v VOL_NAME:VOL_MOUNT_POINT DOCKER_IMAGE_NAME

Example:
docker run -d --name postgresexample -p 5433:5433 --volume-driver nutanix -v PGDataVol:/var/lib/postgresql/data postgres:latest
The following figure shows a high-level overview of the backend workflow:
Docker - Container Creation Workflow
You now have a container running with persistent storage!
©2025 Nutanix, Inc. All rights reserved. Nutanix, the Nutanix logo and all Nutanix product and service names mentioned are registered trademarks or trademarks of Nutanix, Inc. in the United States and other countries. All other brand names mentioned are for identification purposes only and may be the trademarks of their respective holder(s).