» Download this section as PDF (opens in a new tab/window)
Nutanix provides native backup and disaster recovery (DR) capabilities allowing users to backup, restore and DR VM(s) and objects running on DSF to both on-premises or cloud environments (Xi). As of AOS 5.11 Nutanix released a feature called Leap which abstracts a lot of these concepts. For more information on Leap, refer to the ‘Leap’ chapter in ‘Backup/DR Services’.
We will cover the following items in the following sections:
NOTE: Though Nutanix provides native options for backup and dr, traditional solutions (e.g. Commvault, Rubrik, etc.) can also be used, leveraging some of the native features the platform provides (VSS, snapshots, etc.).
Within Nutanix Backup and DR, there are a few key constructs:
Create multiple PDs for various services tiers driven by a desired RPO/RTO. For file distribution (e.g. golden images, ISOs, etc.) you can create a PD with the files to replication.
Group dependent application or service VMs in a consistency group to ensure they are recovered in a consistent state (e.g. App and DB)
The snapshot schedule should be equal to your desired RPO
The retention policy should equal the number of restore points required per VM/file
Ensure the target site has ample capacity (compute/storage) to handle a full site failure. In certain cases replication/DR between racks within a single site can also make sense.
The following figure shows a logical representation of the relationship between a PD, CG, and VM/Files for a single site:
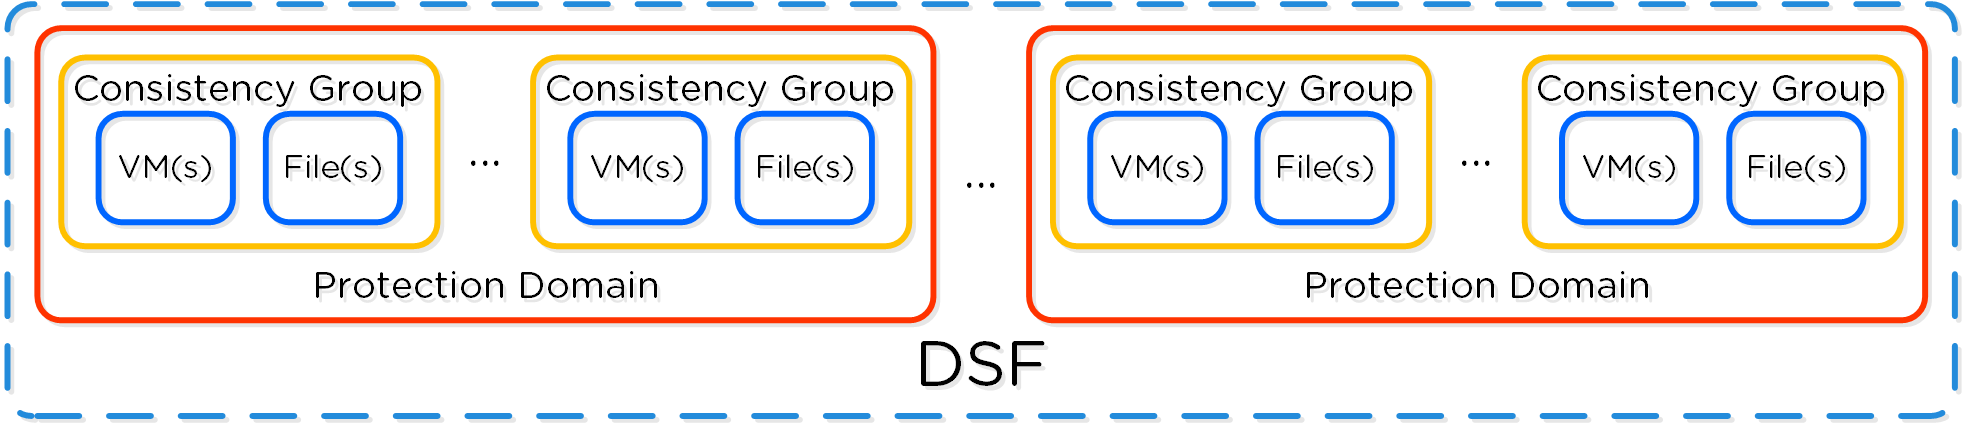 DR Construct Mapping
Policy based DR and run books extends upon the capabilities defined in VM based DR (PDs, CGs, etc.) and abstracts things into a policy driven model. This simplifies configuration by focusing on the items of interest (e.g. RPO, retention, etc.) and assigning to categories instead of directly to VMs. This also allows for a "default policy" that can apply to all VMs.
NOTE: These policies are configured via Prism Central (PC).
You can protect Entities (VMs, VGs, Files), using the following workflow:
From the Data Protection page, select + Protection Domain -> Async DR:
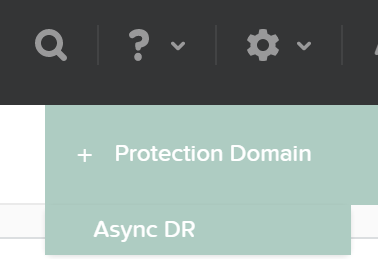 DR - Async PD
Specify a PD name and click ‘Create’
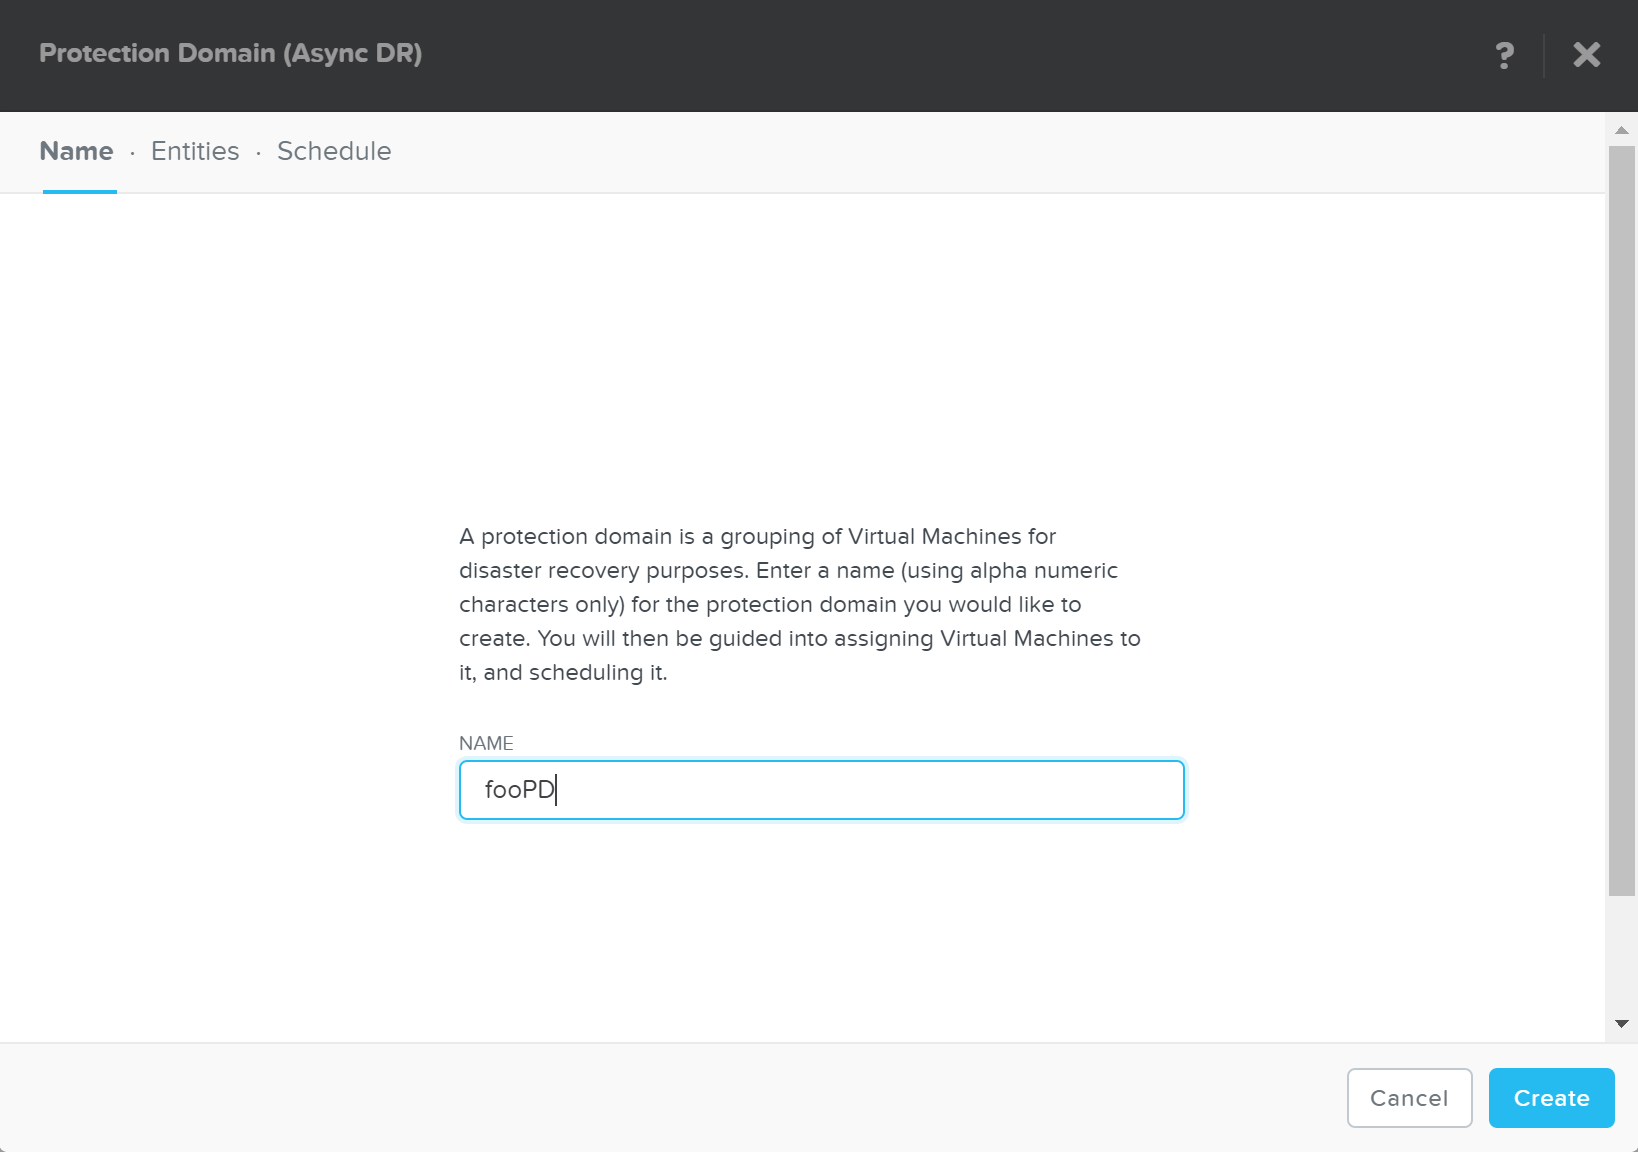 DR - Create PD
Select entities to protect:
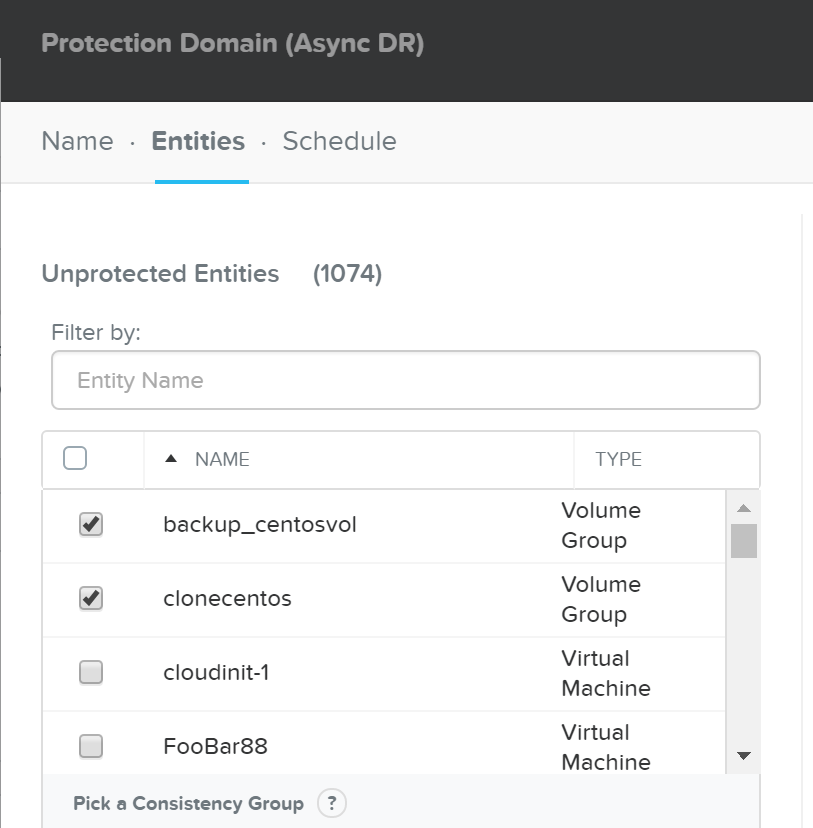 DR - Async PD
Click ‘Protect Selected Entities’
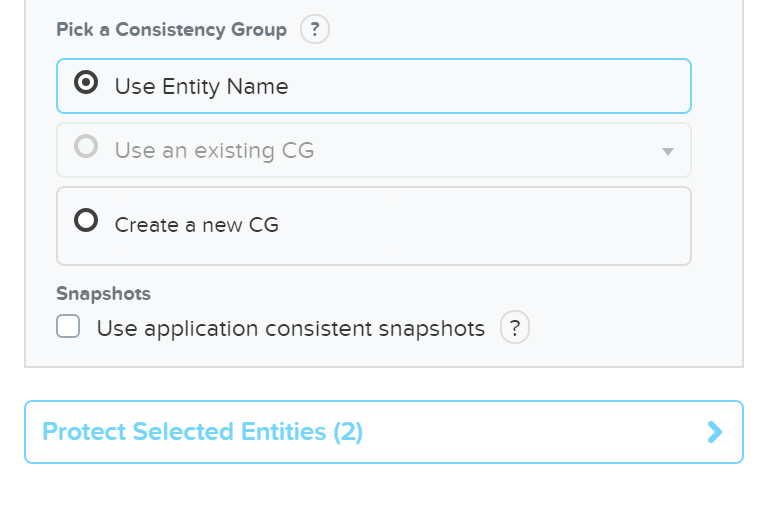 DR - Protect Entities
The protect entities will now be displayed under ‘Protected Entities’
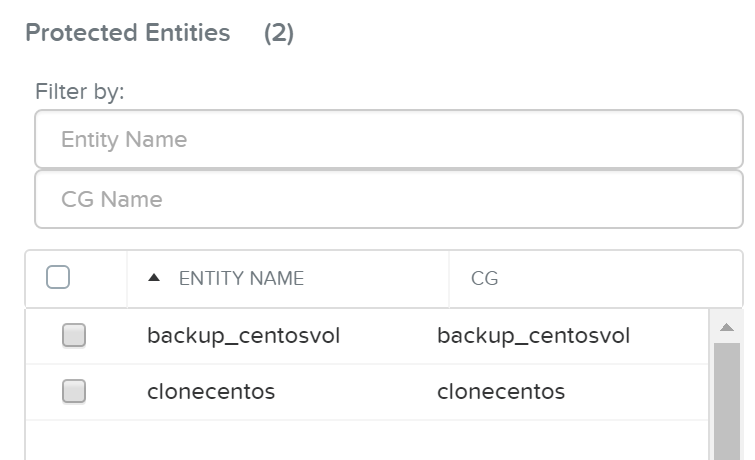 DR - Protected Entities
Click ‘Next’, then click ‘Next Schedule’ to create a snapshot and replication schedule
Enter the desired snapshot frequency, retention and any remote sites for replication
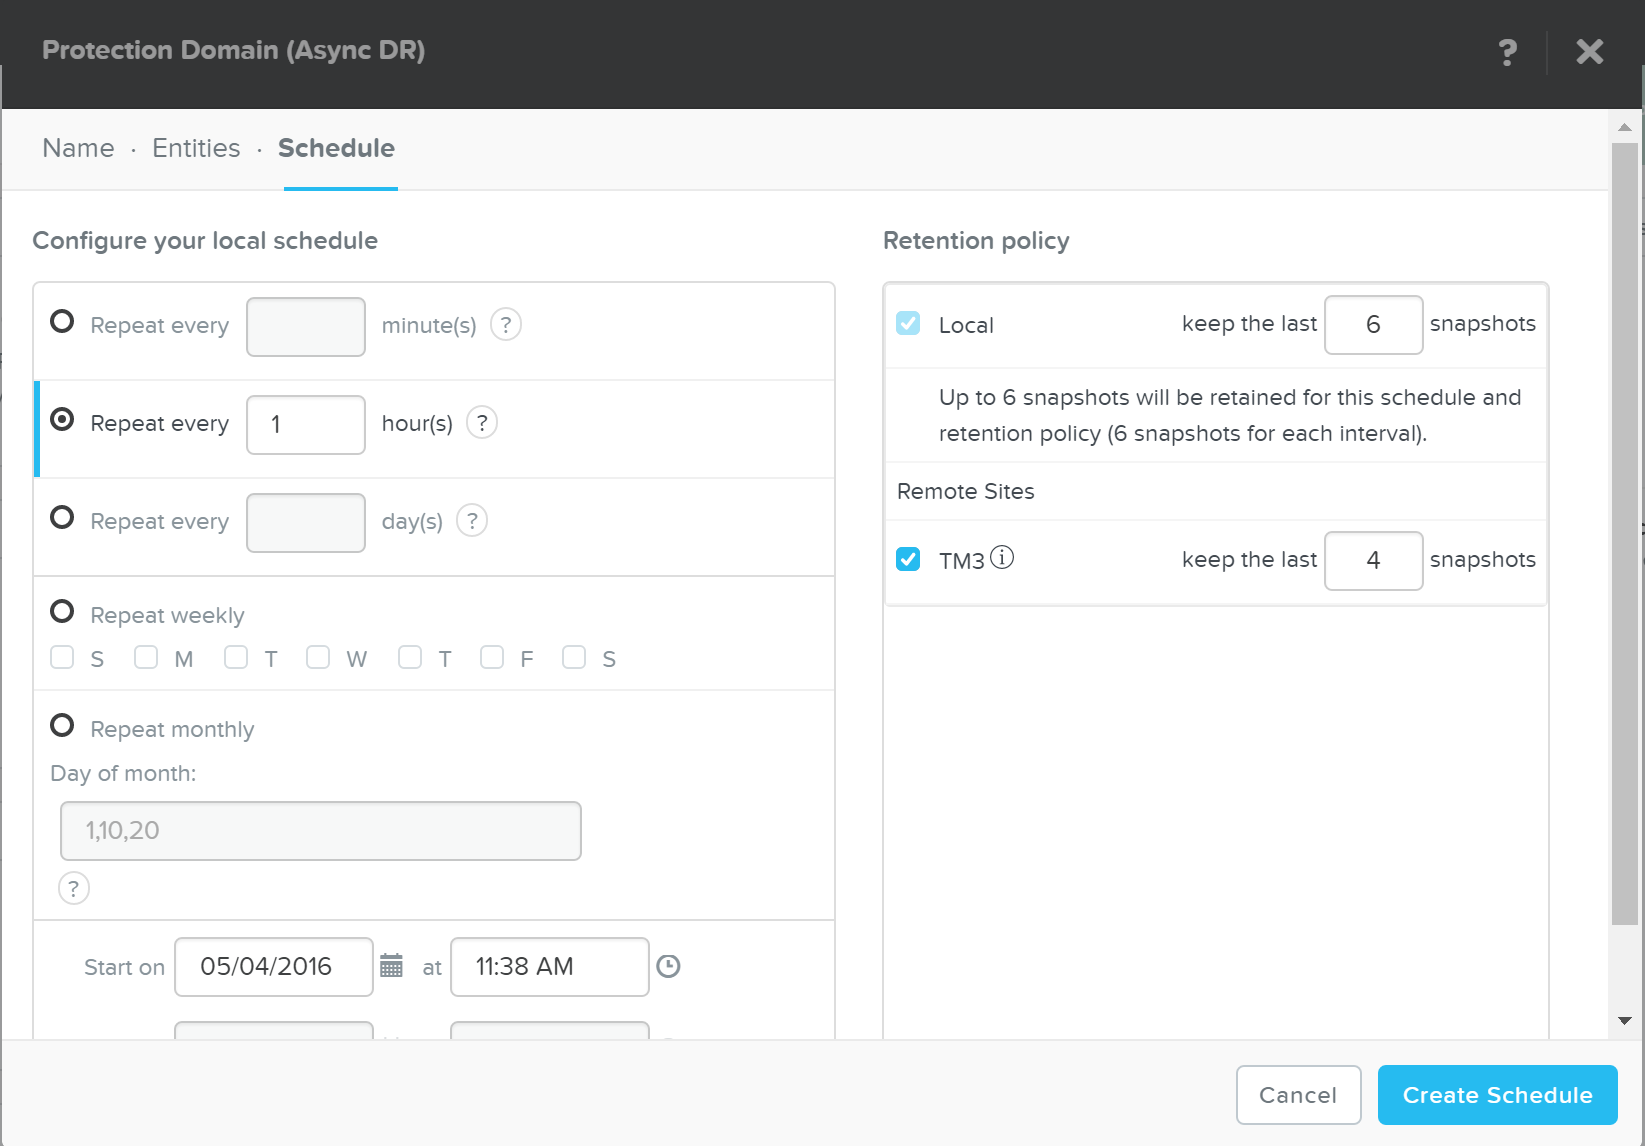 DR - Create Schedule
Click ‘Create Schedule’ to complete the schedule completion.
It is possible to create multiple snapshot / replication schedules. For example, if you want to have a local backup schedule occurring hourly and another schedule which replicated to a remote site daily.
It is important to mention that a full container can be protected for simplicity. However, the platform provides the ability to protect down to the granularity of a single VM and/or file level.
Nutanix backup capabilities leverage the native DSF snapshot capabilities and are invoked by Cerebro and performed by Stargate. These snapshot capabilities are zero copy to ensure efficient storage utilization and low overhead. You can read more on Nutanix snapshots in the ‘Snapshots and Clones’ section.
Typical backup and restore operations include:
From the Data Protection Page, you can see the protection domains (PD) previously created in the ‘Protecting Entities’ section.
 DR - View PDs
Once you’re selected a target PD you can see the various options:
 DR - PD Actions
If you click ‘Take Snapshot’ you can take an ad-hoc snapshot of the selected PD and replicate to a remote site if necessary:
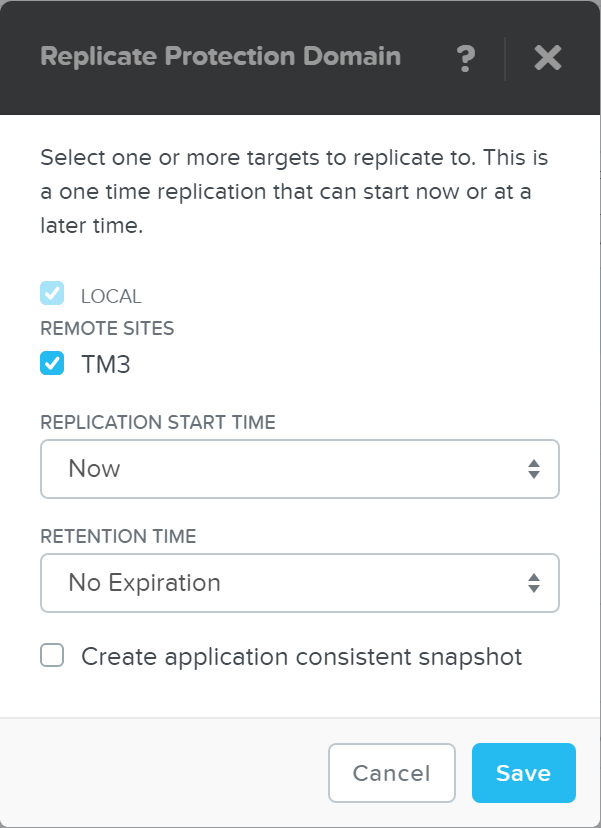 DR - Take Snapshot
You can also ‘Migrate’ the PD which will fail over the entities to a remote site:
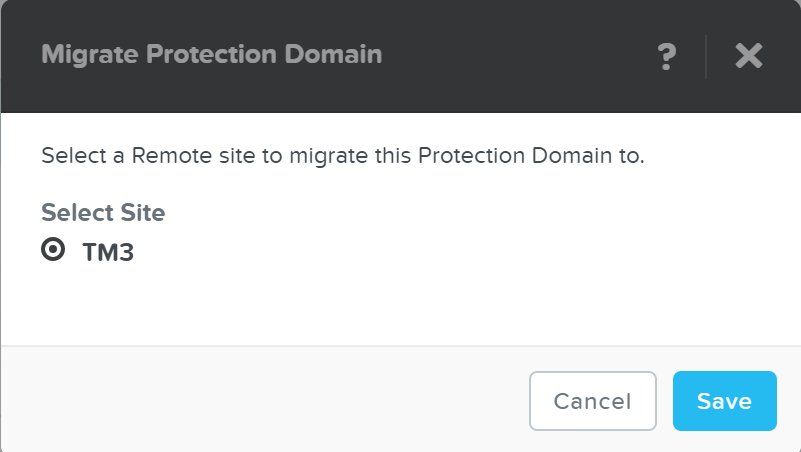 DR - Migrate
In the event of a migrate (controlled failover), the system will take a new snapshot, replicate then promote the other site with the newly created snap.
With AOS 5.0 and above you can now leverage a single node replication target data protection.
You can also view the PD snapshot(s) in the table below:
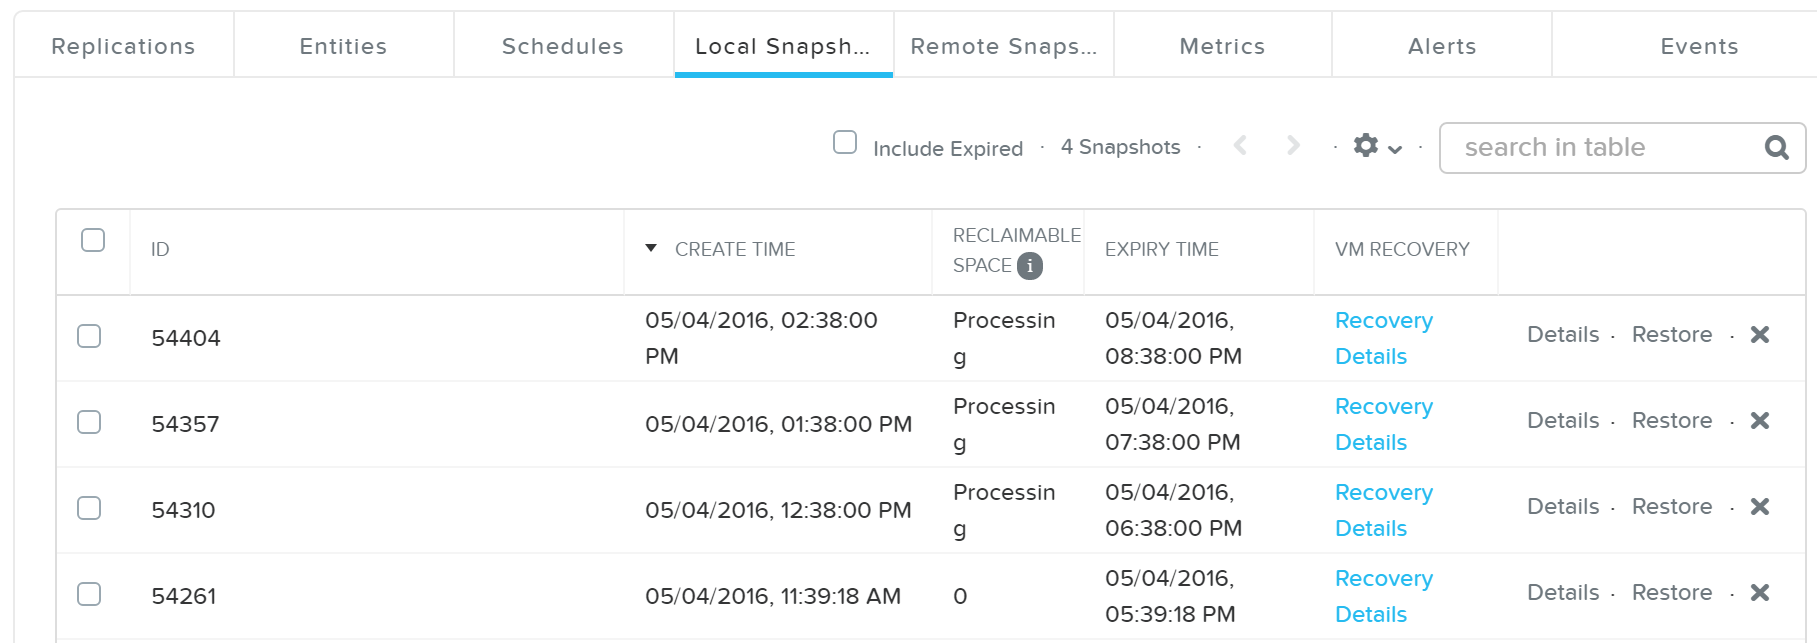 DR - Local Snapshots
From here you can restore or clone a PD snapshot:
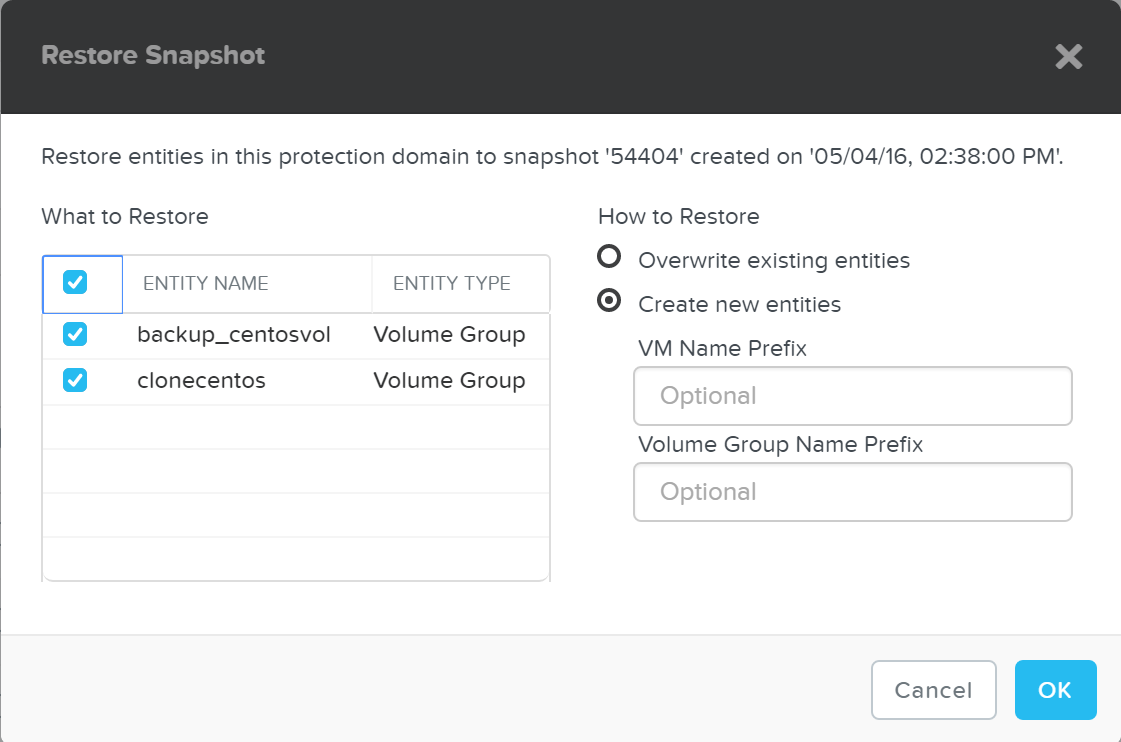 DR - Restore Snapshot
If you choose to ‘Create new entities’ that will be like cloning the snapshot of the PD to new entities with the desired prefixes. Otherwise ‘Overwrite existing entities’ will replace the current entities with those at the time of the snapshot.
For backup / archival only purposes, it is possible to configure a storage only Nutanix cluster as a remote site which will act as a backup target. This will allow data to be replicated to / from the storage only cluster.
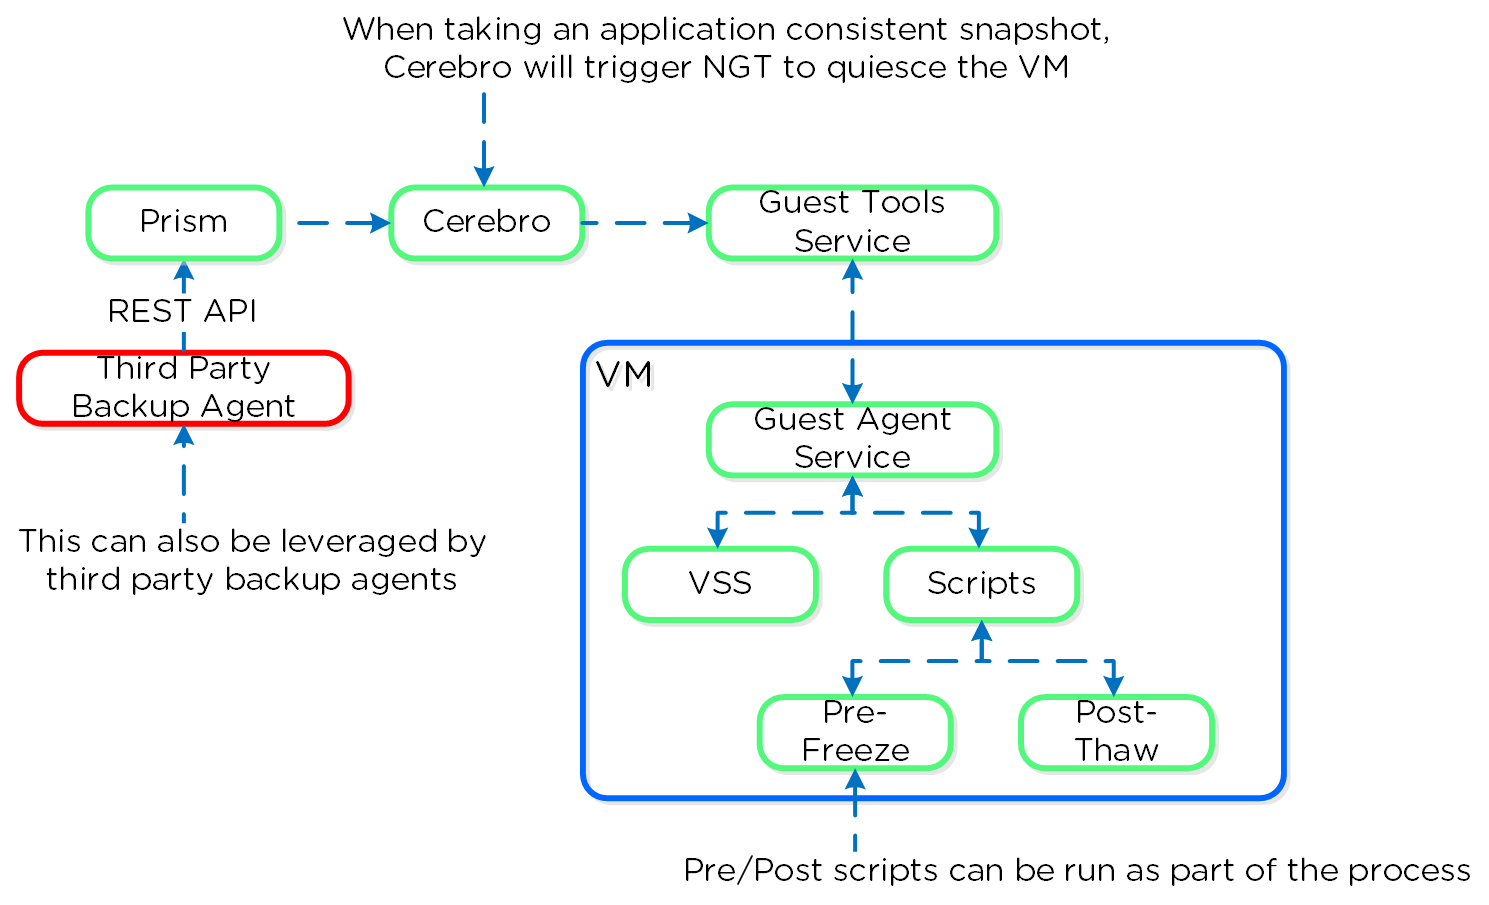
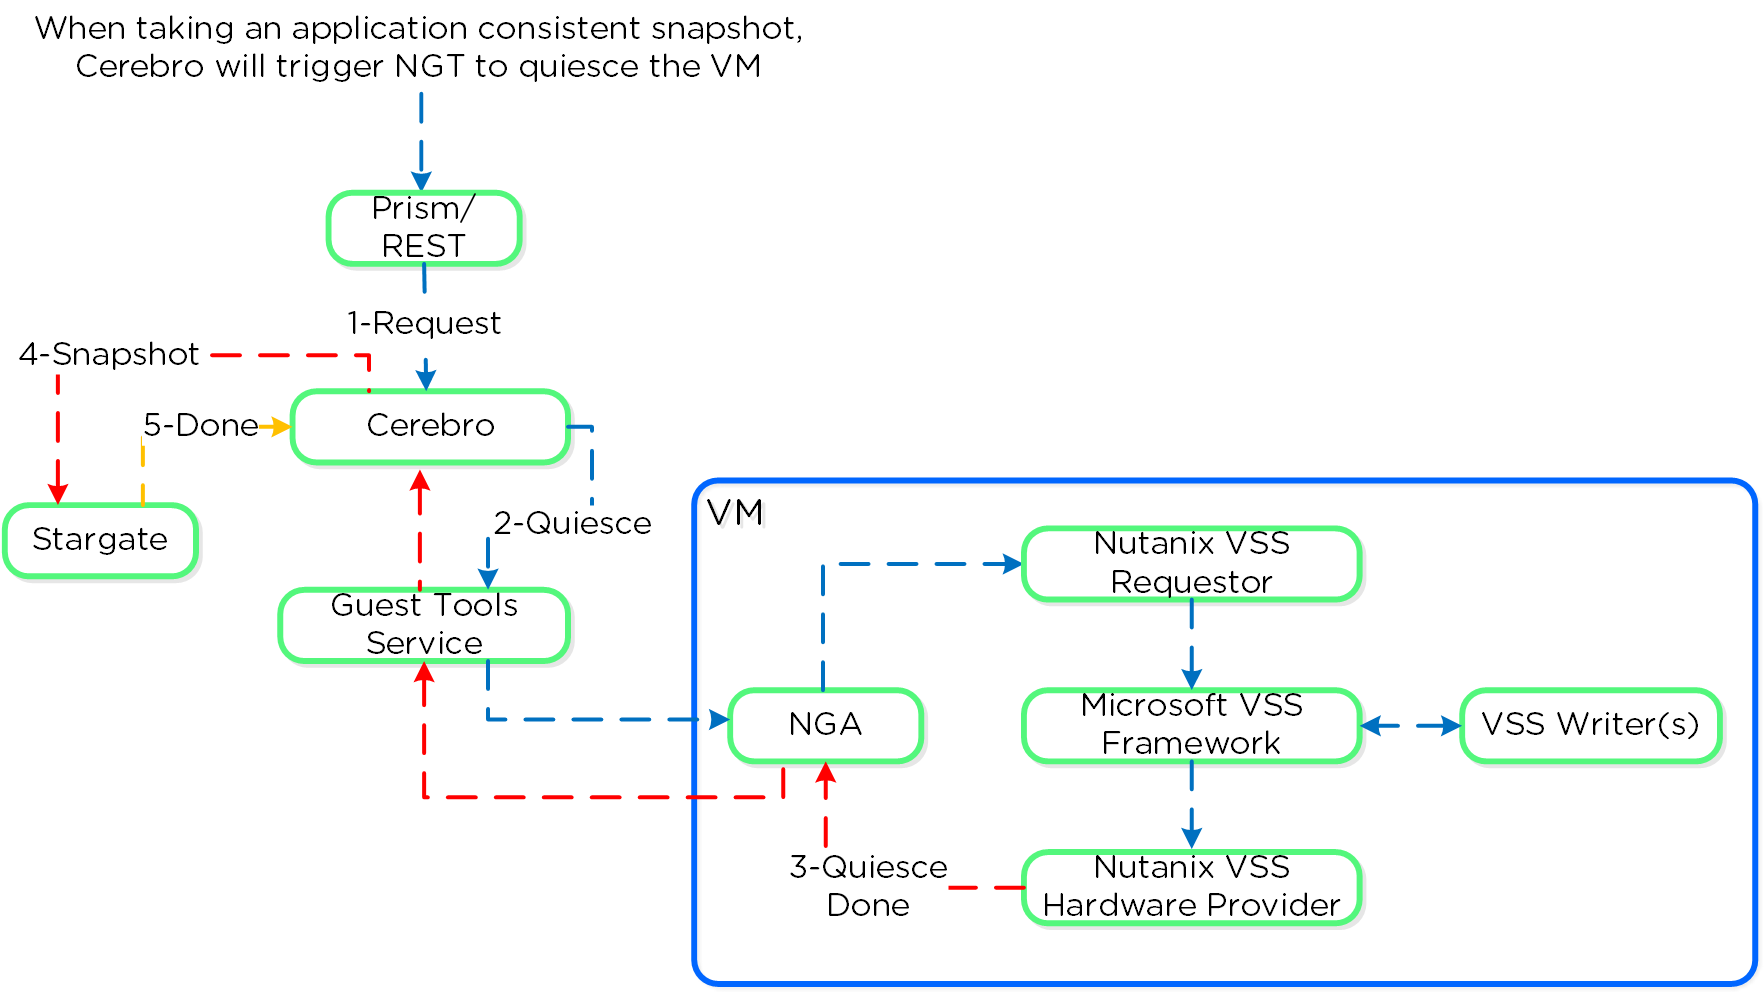
Nutanix provides native VmQueisced Snapshot Service (VSS) capabilities for queiscing OS and application operations which ensure an application consistent snapshot is achieved.
VSS is typically a Windows specific term for Volume Shadow Copy Service. However, since this solution applies to both Windows and Linux we've modified the term to VmQueisced Snapshot Service.
The solution is applicable to both Windows and Linux guests. Refer to “NGT Compatibility” in the Compatibility and Interoperability Matrix for a full list of supported guest OS’s: LINK
In order for Nutanix VSS snapshots to be used the following are necessary:
As of 4.6 this is achieved using the native Nutanix Hardware VSS provider which is installed as part of the Nutanix Guest Tools package. You can read more on the guest tools in the ‘Nutanix Guest Tools’ section.
The following image shows a high-level view of the VSS architecture:
You can perform an application consistent snapshot by following the normal data protection workflow and selecting ‘Use application consistent snapshots’ when protecting the VM.
When NGT is enabled for a UVM, the Nutanix VSS snapshot capability is enabled by default. However, you can turn off this capability with the following command:
ncli ngt disable-applications application-names=vss_snapshot vm_id=VM_ID
The Nutanix VSS solution is integrated with the Windows VSS framework. The following shows a high-level view of the architecture:
 Nutanix VSS - Windows Architecture
Once NGT is installed you can see the NGT Agent and VSS Hardware Provider services:
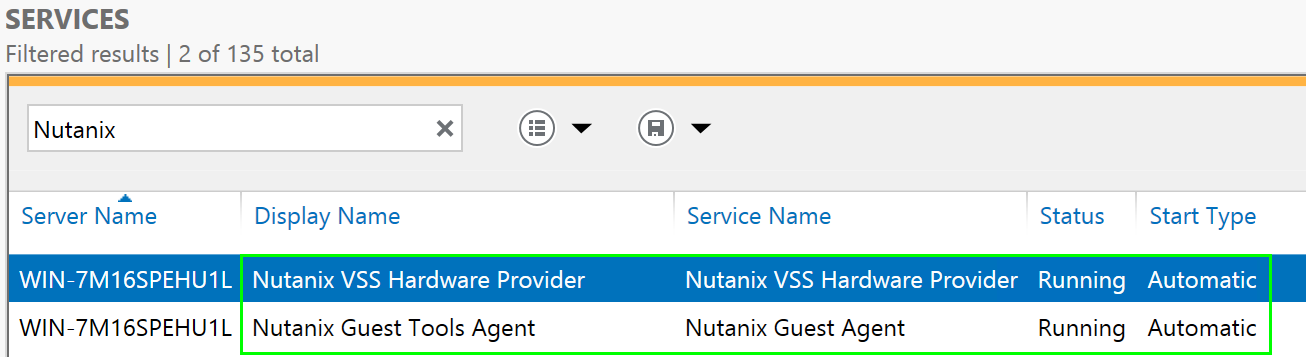 VSS Hardware Provider
The Linux solution works similar to the Windows solution, however scripts are leveraged instead of the Microsoft VSS framework as it doesn’t exist in Linux distros.
The Nutanix VSS solution is integrated with the Windows VSS framework. The following shows a high-level view of the architecture:
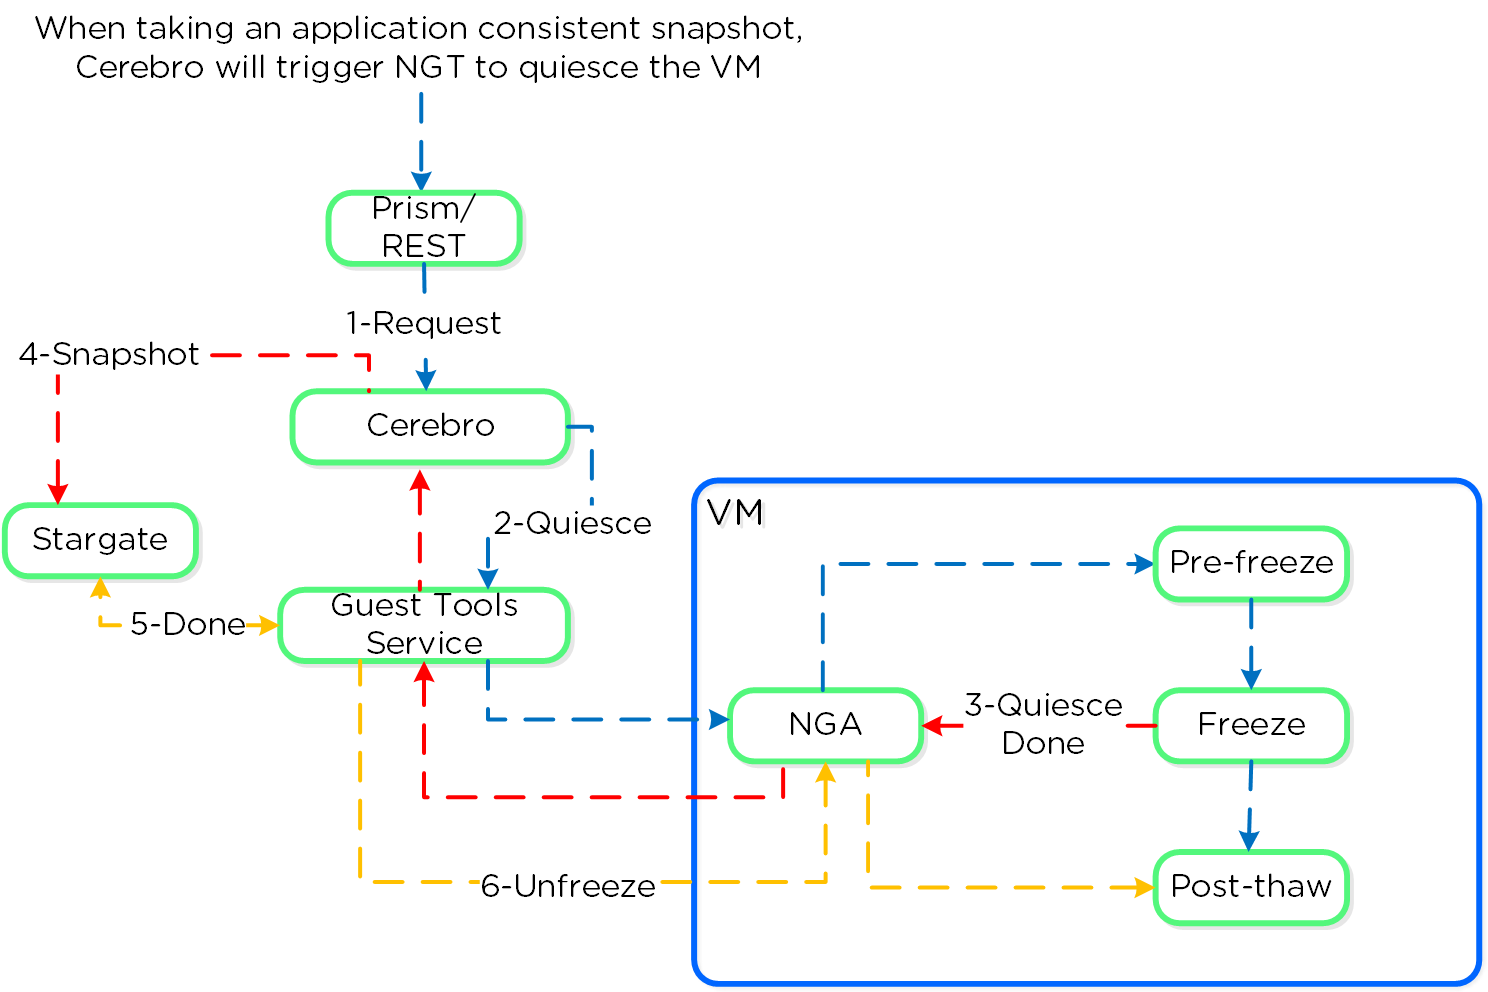 Nutanix VSS - Linux Architecture
The pre-freeze and post-thaw scripts are located in the following directories:
ESXi has native app consistent snapshot support using VMware guest tools. However, during this process, delta disks are created and ESXi "stuns" the VM in order to remap the virtual disks to the new delta files which will handle the new write IO. Stuns will also occur when a VMware snapshot is deleted.
During this stun process the VM its OS cannot execute any operations and is essentially in a "stuck" state (e.g. pings will fail, no IO). The duration of the stun will depend on the number of vmdks and speed of datastore metadata operations (e.g. create new delta disks, etc.)
By using Nutanix VSS we completely bypass the VMware snapshot / stun process and have little to no impact to performance or VM / OS availability.
For a visual explanation, you can watch the following video: LINK
Nutanix provides native DR and replication capabilities, which build upon the same features explained in the Snapshots & Clones section. Cerebro is the component responsible for managing the DR and replication in DSF. Cerebro runs on every node and a Cerebro leader is elected (similar to NFS leader) and is responsible for managing replication tasks. In the event the CVM acting as Cerebro leader fails, another is elected and assumes the role. The Cerebro page can be found on
Traditionally, there are a few key replication topologies: Site to site, hub and spoke, and full and/or partial mesh. Contrary to traditional solutions which only allow for site to site or hub and spoke, Nutanix provides a fully mesh or flexible many-to-many model.
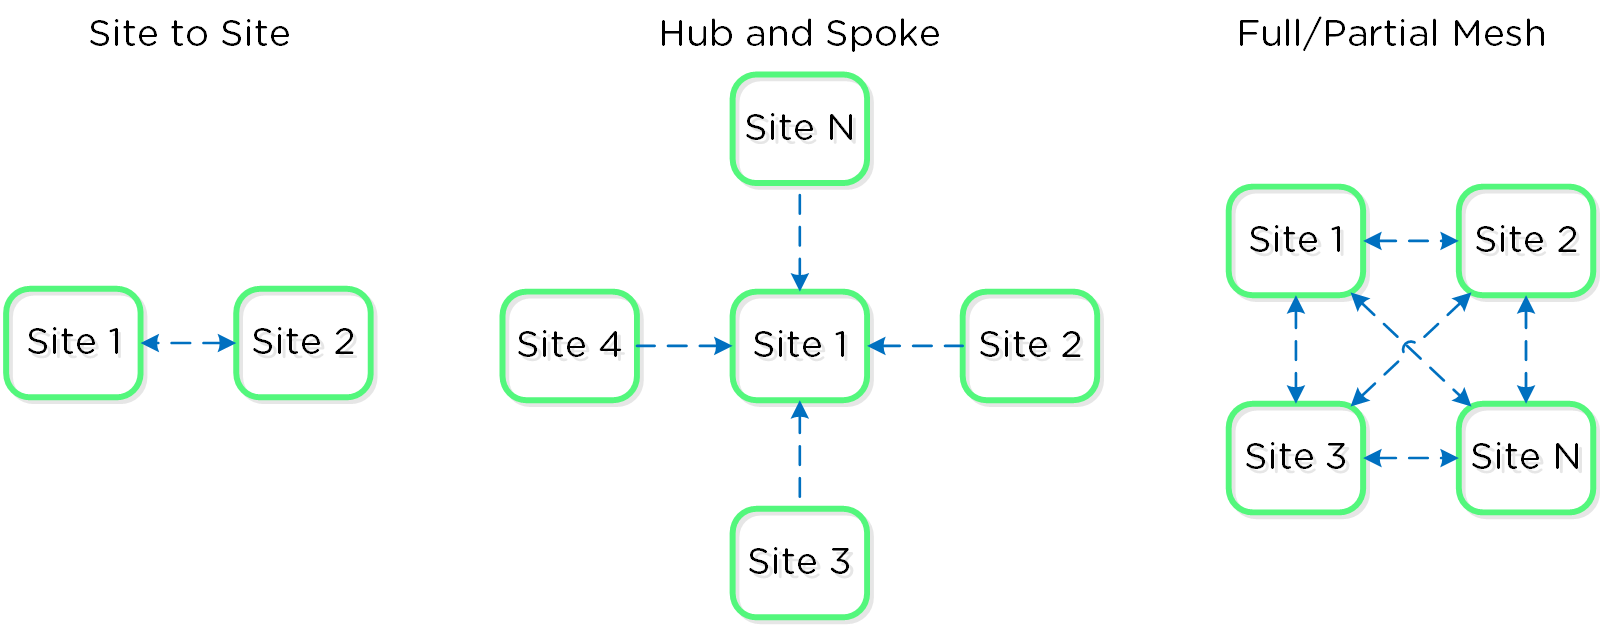 Example Replication Topologies
Essentially, this allows the admin to determine a replication capability that meets their company’s needs.
Nutanix replication leverages the Cerebro service mentioned above. The Cerebro service is broken into a “Cerebro Leader”, which is a dynamically elected CVM, and Cerebro Workers, which run on every CVM. In the event where the CVM acting as the “Cerebro Leader” fails, a new “Leader” is elected.
The Cerebro Leader is responsible for managing task delegation to the local Cerebro Workers as well as coordinating with remote Cerebro Leader(s) when remote replication is occurring.
During a replication, the Cerebro Leader will figure out which data needs to be replicated, and delegate the replication tasks to the Cerebro Workers which will then tell Stargate which data to replicate and to where.
Replicated data is protected at multiple layers throughout the process. Extent reads on the source are checksummed to ensure consistency for source data (similar to how any DSF read occurs) and the new extent(s) are checksummed at the target (similar to any DSF write). TCP provides consistency on the network layer.
The following figure shows a representation of this architecture:
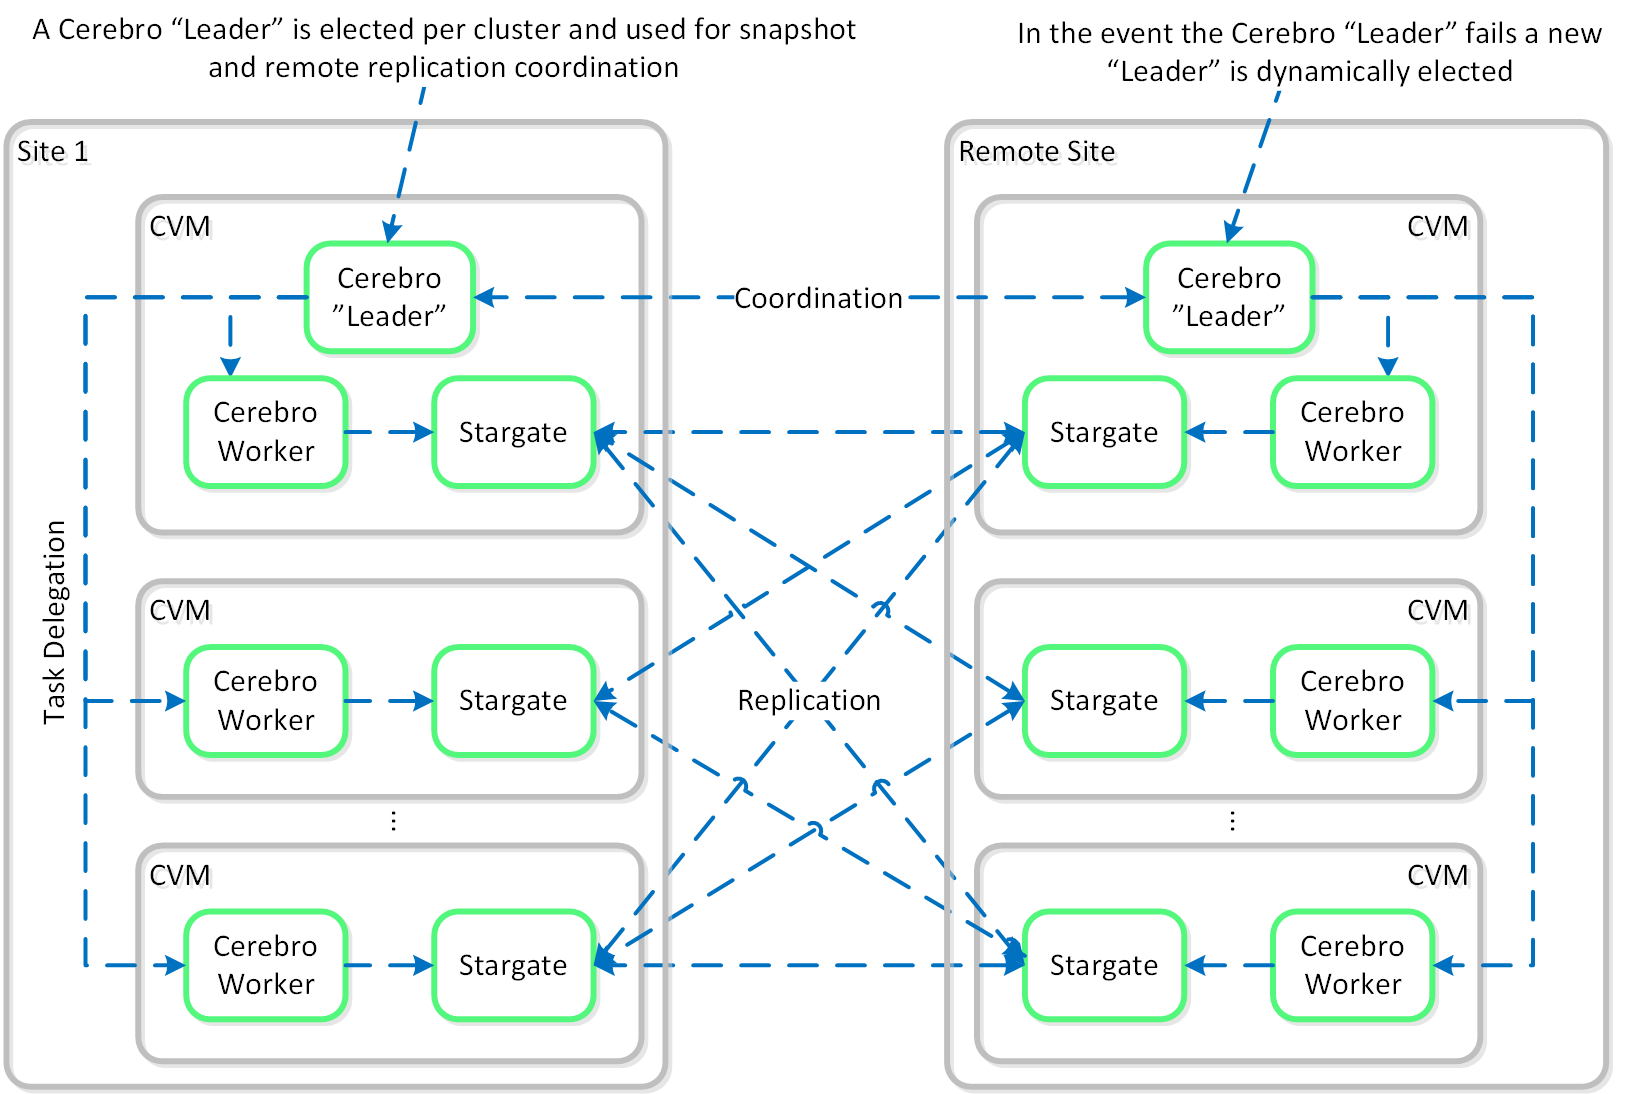 Replication Architecture
It is also possible to configure a remote site with a proxy which will be used as a bridgehead for all coordination and replication traffic coming from a cluster.
When using a remote site configured with a proxy, always utilize the cluster IP as that will always be hosted by the Prism Leader and available, even if CVM(s) go down.
The following figure shows a representation of the replication architecture using a proxy:
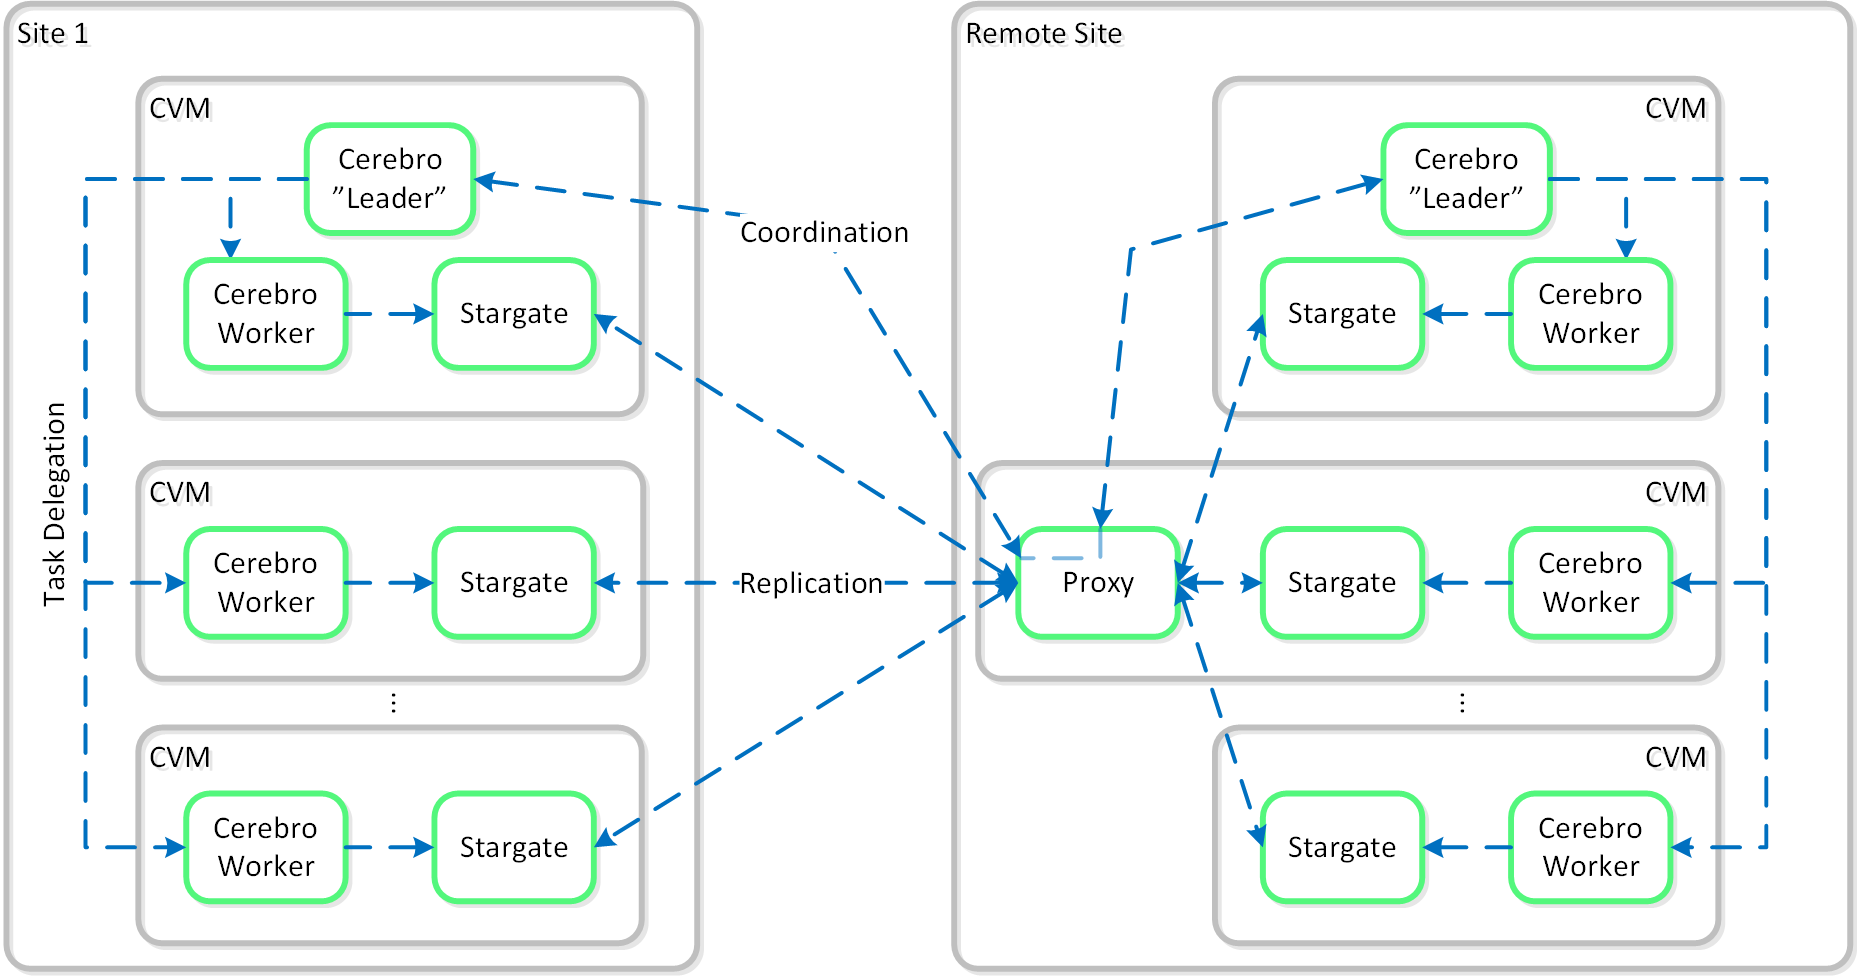 Replication Architecture - Proxy
In certain scenarios, it is also possible to configure a remote site using a SSH tunnel where all traffic will flow between two CVMs.
The following figure shows a representation of the replication architecture using a SSH tunnel:
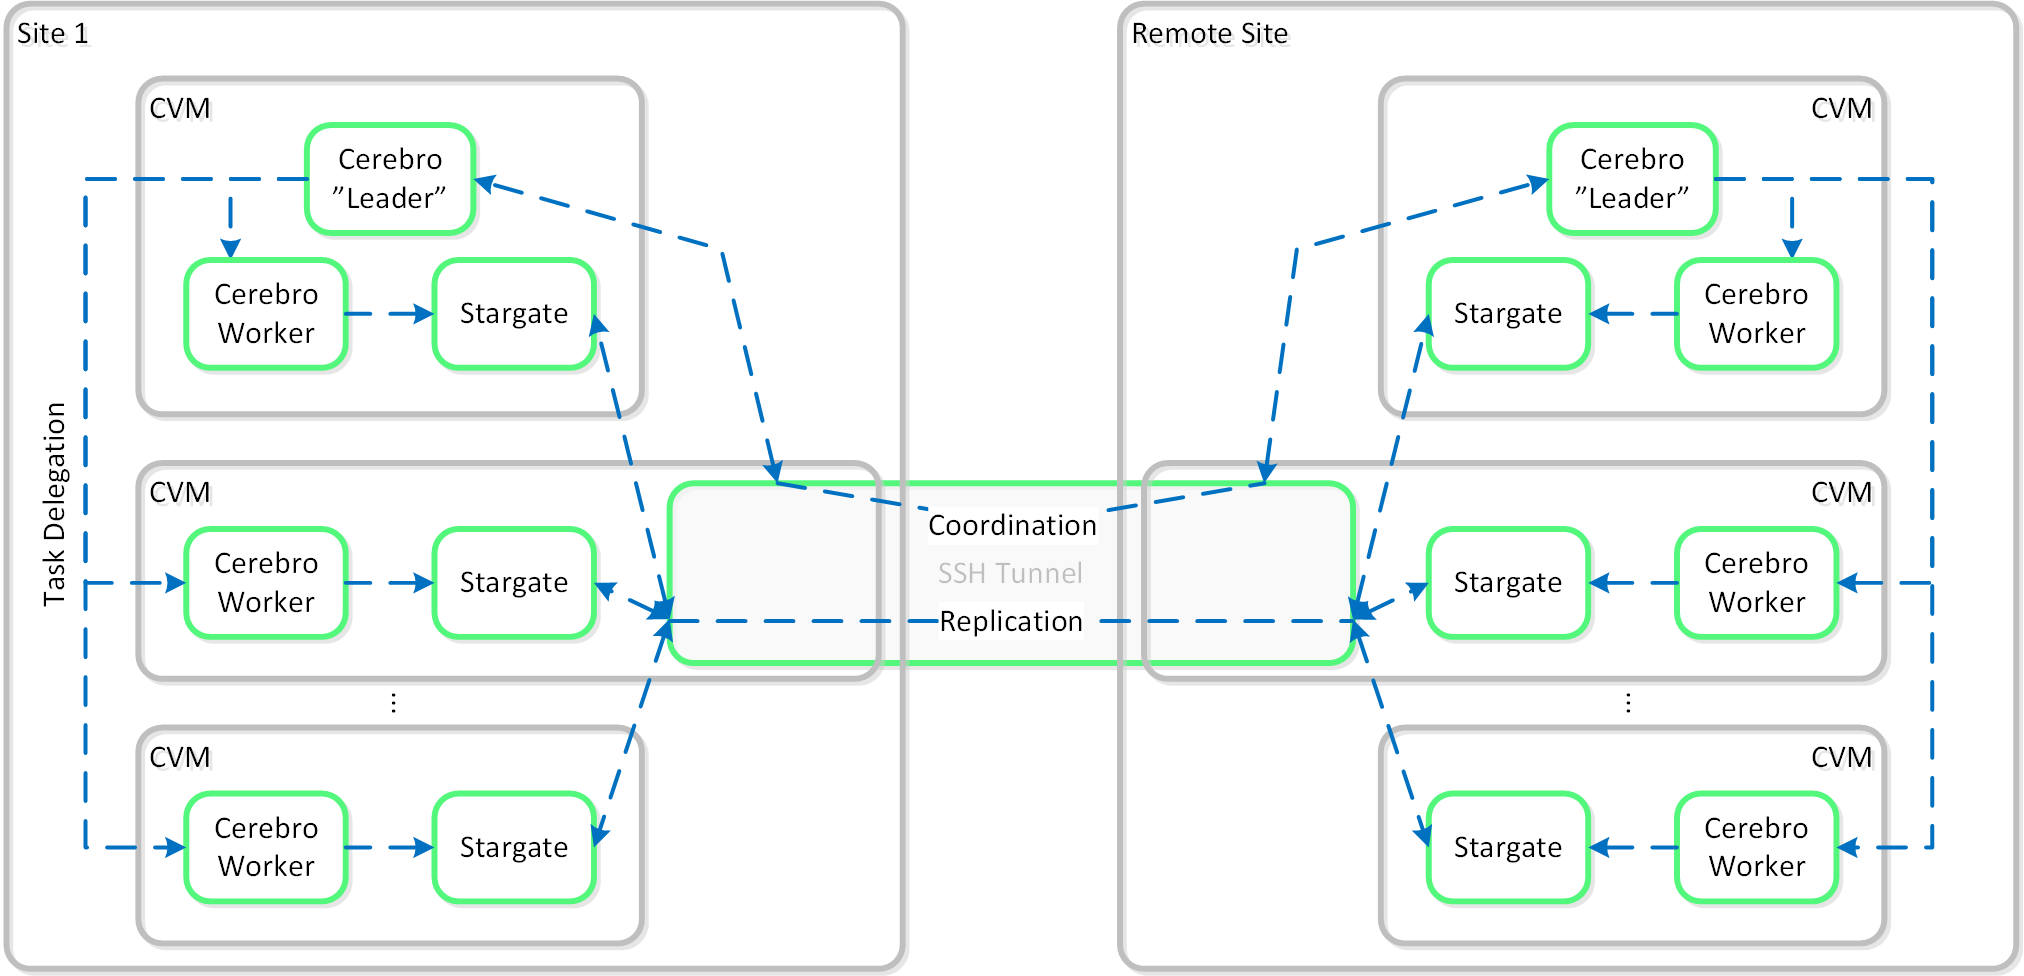 Replication Architecture - SSH Tunnel
As explained in the Elastic Deduplication Engine section above, DSF has the ability to deduplicate data by just updating metadata pointers. The same concept is applied to the DR and replication feature. Before sending data over the wire, DSF will query the remote site and check whether or not the fingerprint(s) already exist on the target (meaning the data already exists). If so, no data will be shipped over the wire and only a metadata update will occur. For data which doesn’t exist on the target, the data will be compressed and sent to the target site. At this point, the data existing on both sites is usable for deduplication.
The following figure shows an example three site deployment where each site contains one or more protection domains (PD):
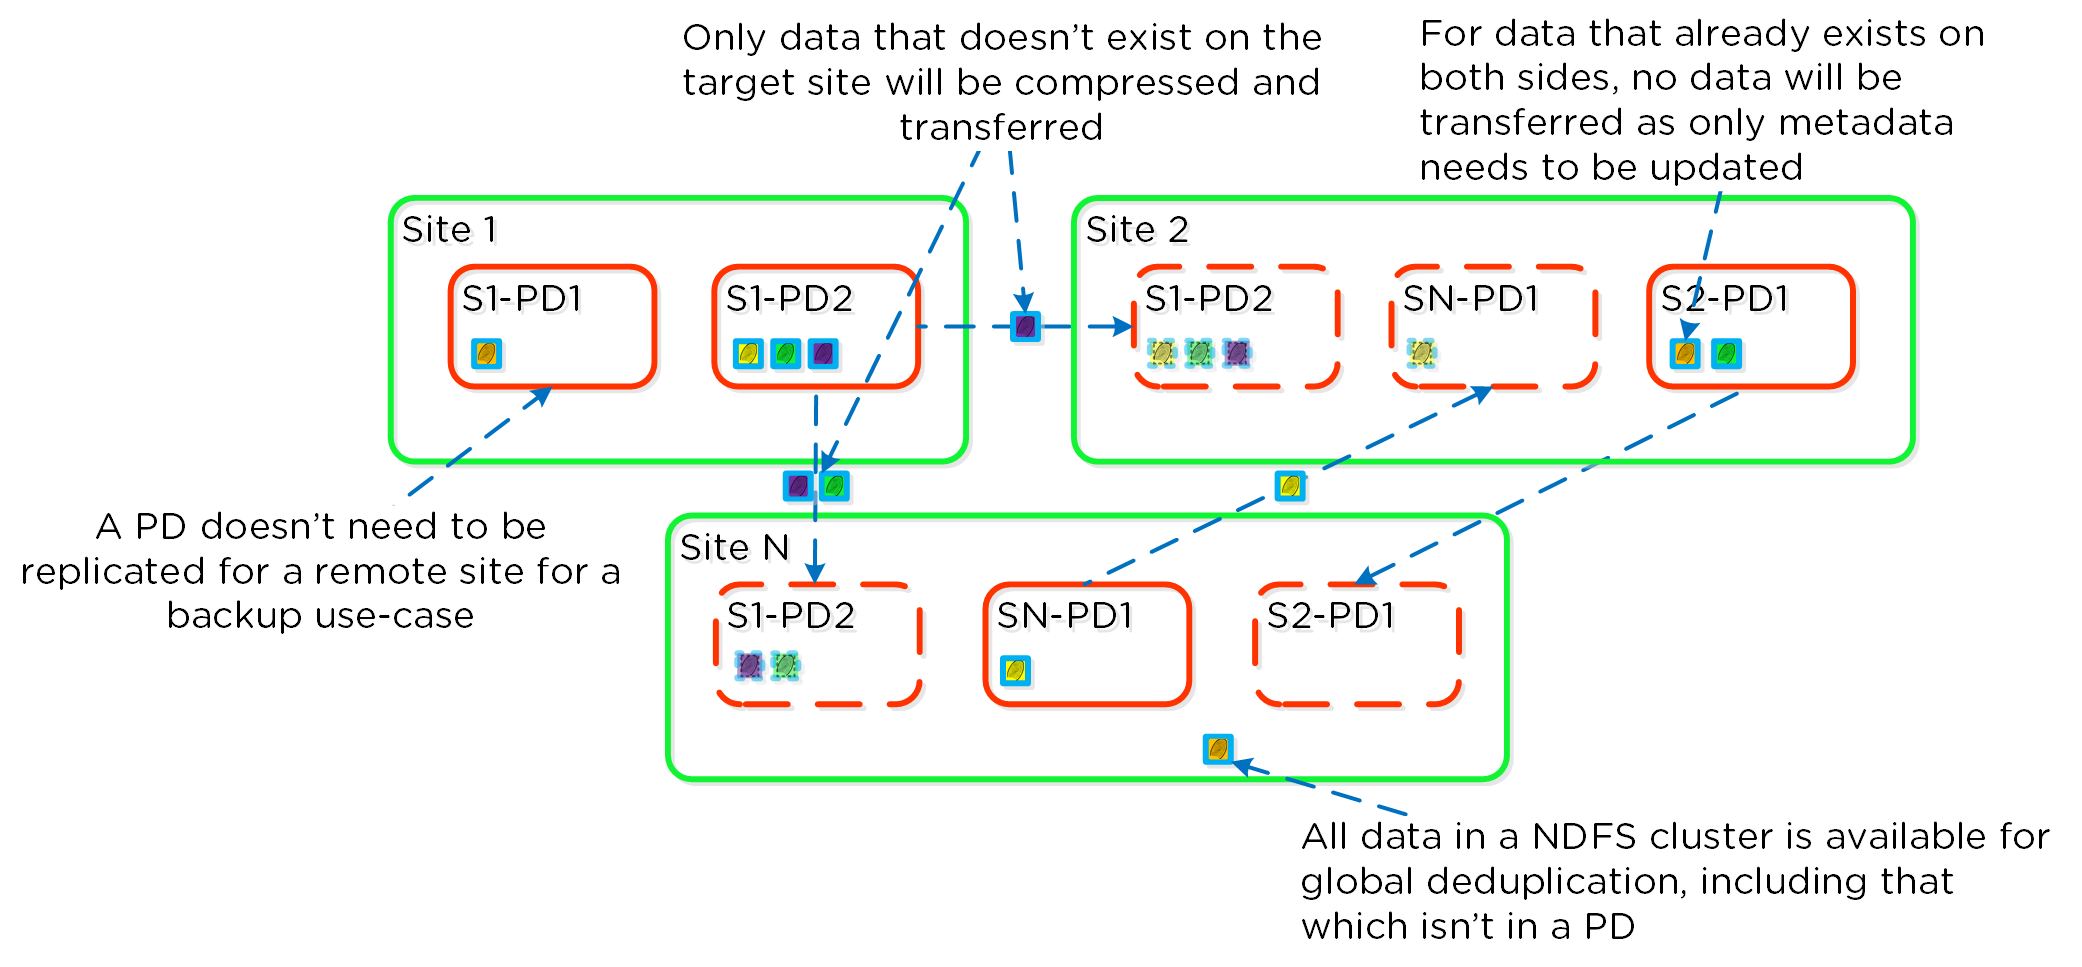 Replication Deduplication
Fingerprinting must be enabled on the source and target container / vstore for replication deduplication to occur.
Building upon the traditional asynchronous (async) replication capabilities mentioned previously; Nutanix has introduced support for near synchronous replication (NearSync).
NearSync provides the best of both worlds: zero impact to primary I/O latency (like async replication) in addition to a very low RPO (like sync replication (metro)). This allows users have a very low RPO without having the overhead of requiring synchronous replication for writes.
This capability uses a new snapshot technology called light-weight snapshot (LWS). Unlike the traditional vDisk based snapshots used by async, this leverages markers and is completely OpLog based (vs. vDisk snapshots which are done in the Extent Store).
Mesos is a new service added to manage the snapshot layer and abstract the complexities of the full/incremental snapshots. Cerebro continues to manage the high-level constructs and policies (e.g. consistency groups, etc.) whereas Mesos is responsible for interacting with Stargate and controlling the LWS lifecycle.
The following figure shows an example of the communication between the NearSync components:
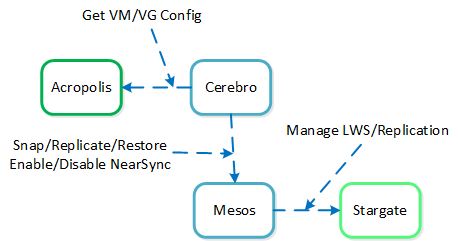 NearSync Component Interaction
When a user configures a snapshot frequency <= 15 minutes, NearSync is automatically leveraged. Upon this, an initial seed snapshot is taken then replicated to the remote site(s). Once this completes in < 60 minutes (can be the first or n later), another seed snapshot is immedatly taken and replicated in addition to LWS snapshot replication starting. Once the second seed snapshot finishes replication, all already replicated LWS snapshots become valid and the system is in stable NearSync.
The following figure shows an example timeline from enabling NearSync to execution:
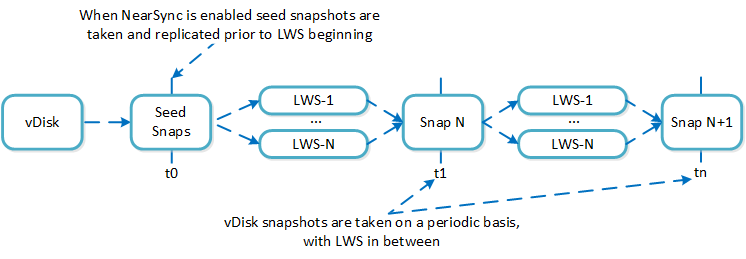 NearSync Replication Lifecycle
During a steady run state vDisk snapshots are taken every hour. Rather than sending the snapshot over to the remote site in addition to the LWS, the remote site composes the vDisk snapshot based upon the prior vDisk snapshot and the LWS from that time.
In the event NearSync falls out of sync (e.g. network outage, WAN latency, etc.) causing the LWS replication to take > 60 minutes, the system will automatically switch back to vDisk based snapshots. When one of these completes in < 60 minutes, the system will take another snapshot immediately as well as start replicating LWS. Once the full snapshot completes, the LWS snapshots become valid and the system is in stable NearSync. This process is similar to the initial enabling of NearSync.
When a LWS based snap is restored (or cloned), the system will take a clone of the latest vDisk snapshot and apply the LWS incrementally until the desired LWS is reached.
The following figure shows an example of how a LWS based snapshot is restored:
 vDisk Restore from LWS
Nutanix provides native “stretch clustering” capabilities which allow for a compute and storage cluster to span multiple physical sites. In these deployments, the compute cluster spans two locations and has access to a shared pool of storage.
This expands the VM HA domain from a single site to between two sites providing a near 0 RTO and a RPO of 0.
In this deployment, each site has its own Nutanix cluster, however the containers are “stretched” by synchronously replicating to the remote site before acknowledging writes.
The following figure shows a high-level design of what this architecture looks like:
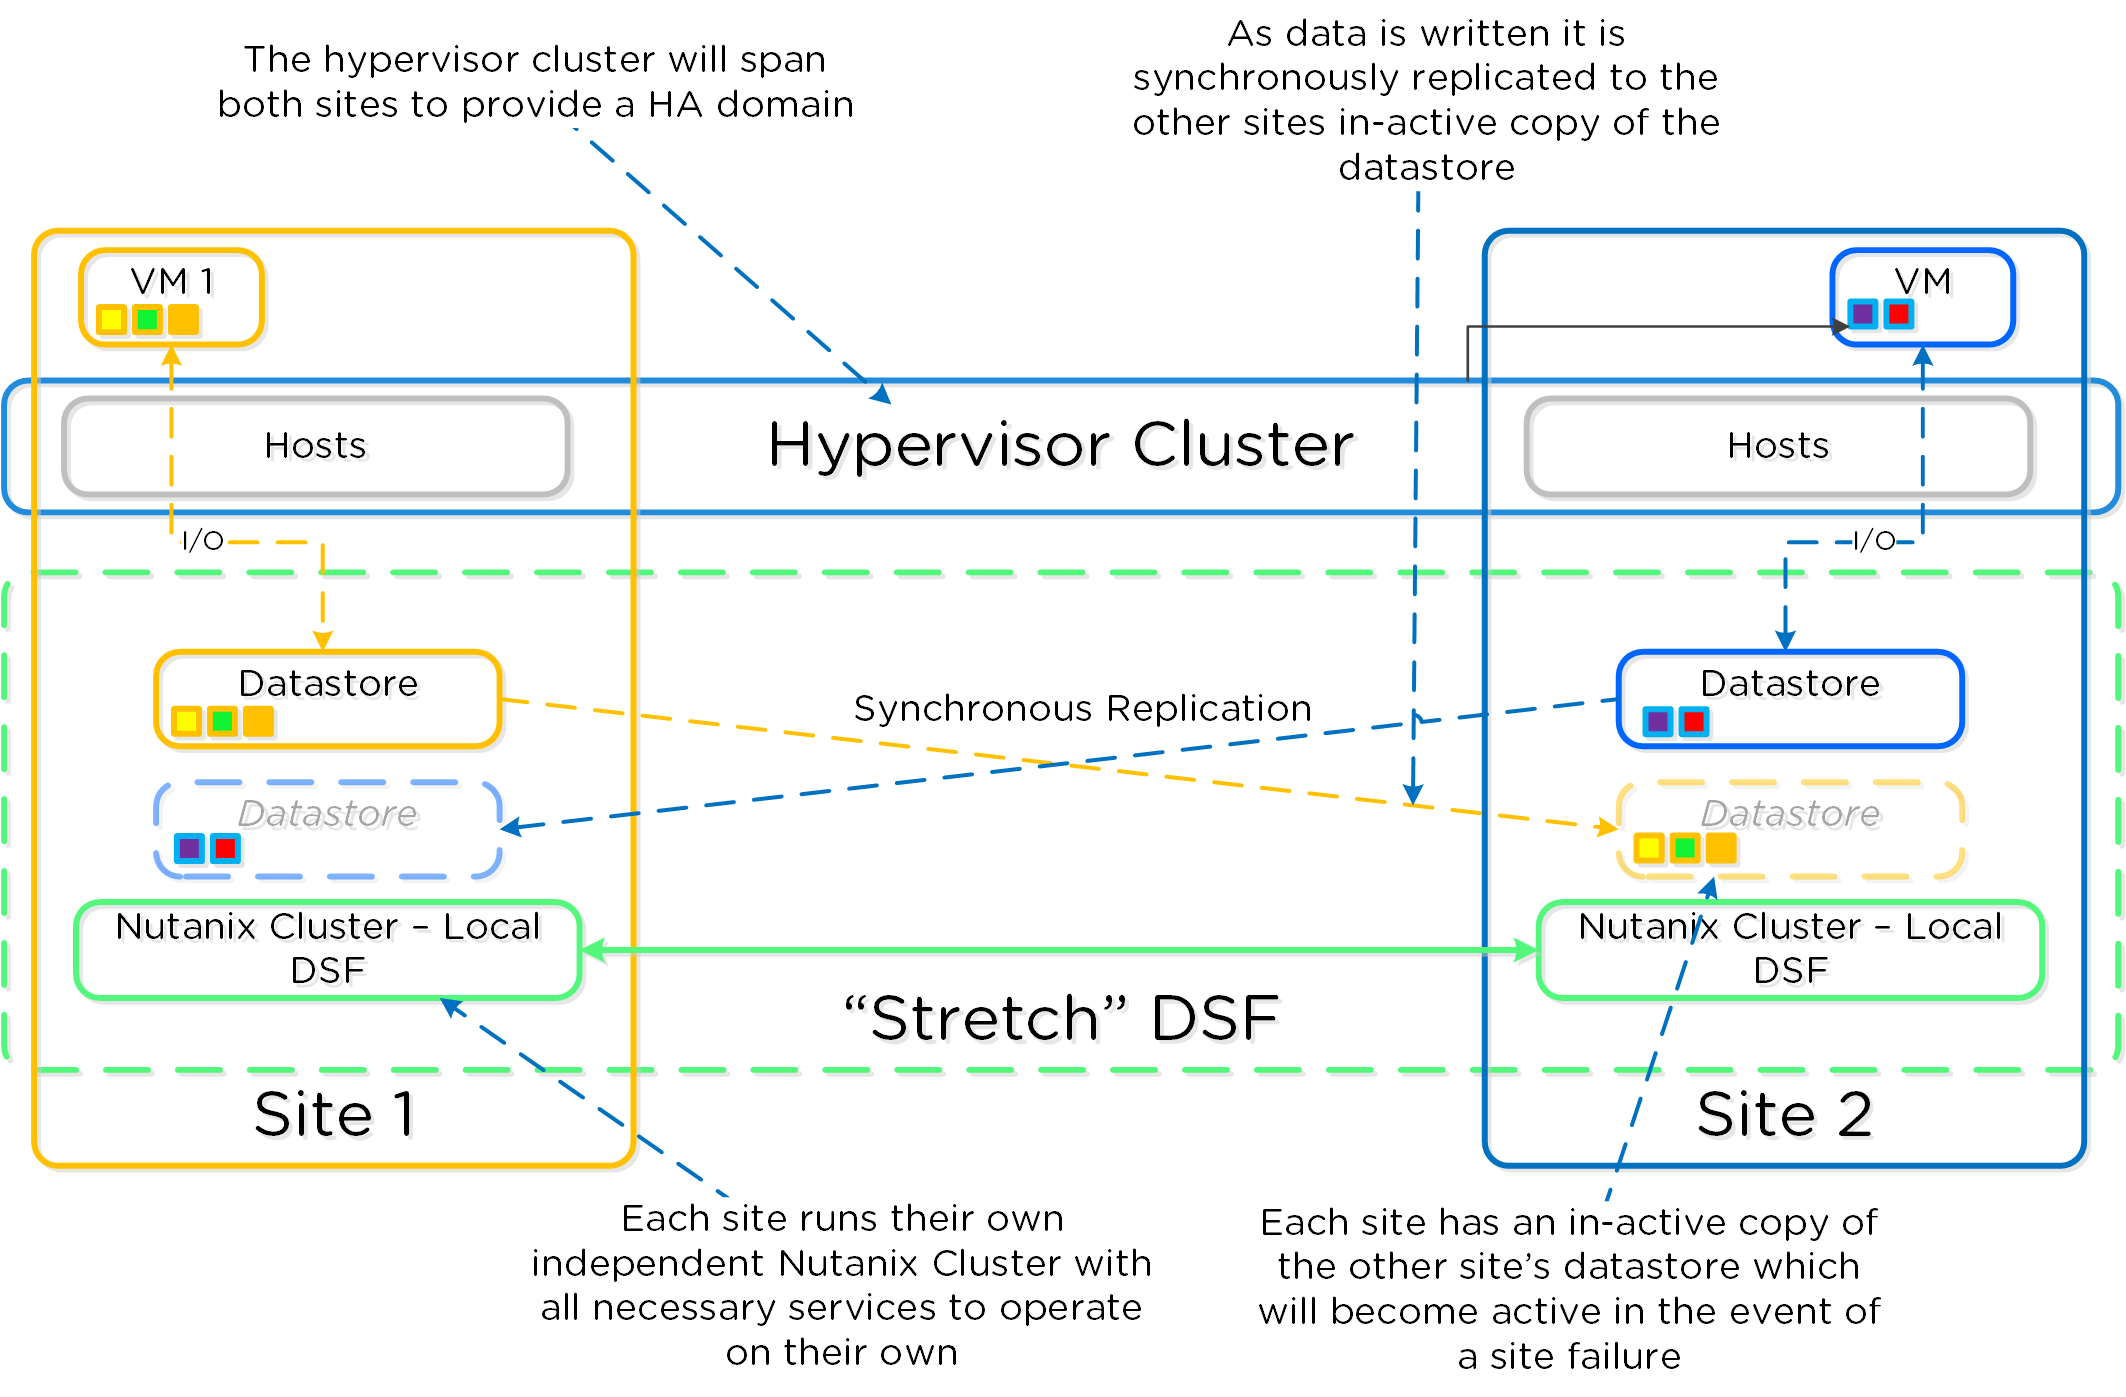 Metro Availability - Normal State
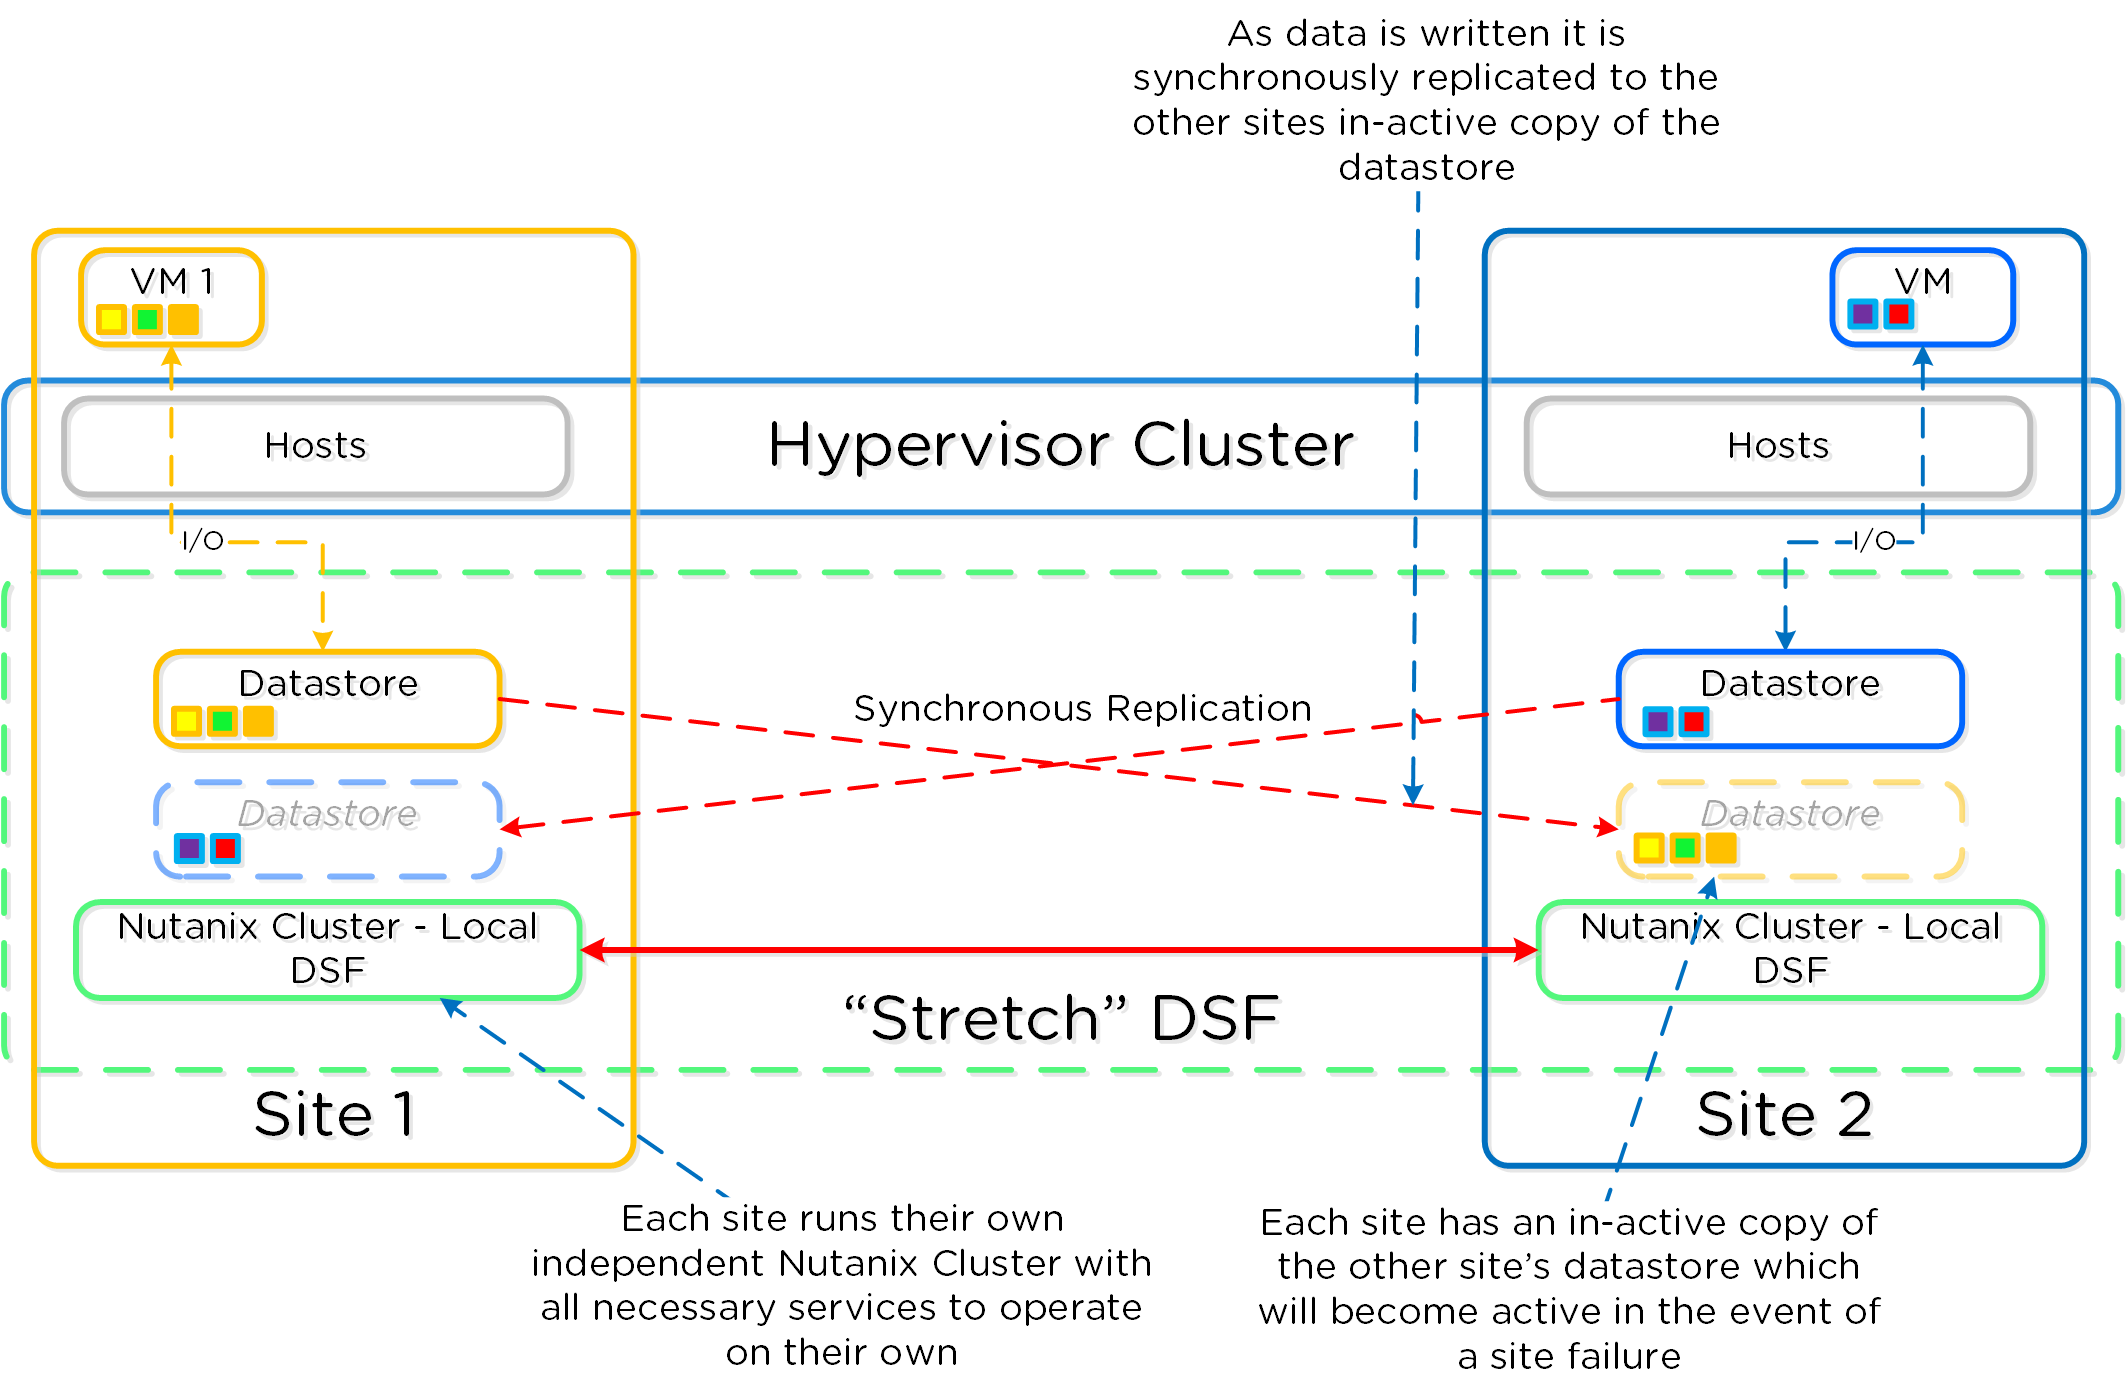
In the event of a site failure, an HA event will occur where the VMs can be restarted on the other site. The failover process is typically a manual process. With the AOS 5.0 release a Metro Witness can be configured which can automate the failover. The witness can be downloaded via the Portal and is configured via Prism.
The following figure shows an example site failure:
 Metro Availability - Site Failure
In the event where there is a link failure between the two sites, each cluster will operate independently. Once the link comes back up, the sites will be re-synchronized (deltas-only) and synchronous replication will start occurring.
The following figure shows an example link failure:
 Metro Availability - Link Failure
©2025 Nutanix, Inc. All rights reserved. Nutanix, the Nutanix logo and all Nutanix product and service names mentioned are registered trademarks or trademarks of Nutanix, Inc. in the United States and other countries. All other brand names mentioned are for identification purposes only and may be the trademarks of their respective holder(s).