» Download this section as PDF (opens in a new tab/window)
Security is a core part of the Nutanix platform and was kept in mind from day one. The Nutanix Security Development Lifecycle (SecDL) incorporates security into every step of the development process. The Nutanix controlled parts of the platform is secure out of the box, rather than being an afterthought requiring end-users to “harden” the platform.
When we think about security we’re really trying to achieve 3 core things (aptly named the CIA triad):
This can be simplified down to a simple statement: enable users to do their jobs while keeping the bad people out. When we’re designing for security we need to look at a few core areas of interest which is highlighted in the following diagram:
 Security Layers
We will break down each section in the prior graphic in the following sections.
Traditionally people refer to system (OS + App) security using a method called “hardening”. This is the process to which you would secure the system by configuring things to a certain standard called a baseline.
The DoD’s IT org (DISA) has a sample hardening guide which they call the STIG (more details in the SCMA section following). This includes things like directory permissions, user account management, password complexity, firewalls and a slew of other configuration settings.
Once a system is configured to that standard it is considered “secure” however that is just the beginning of the process. System security is something that must be maintained throughout its lifespan. For example, to ensure that standard hardening baseline is met, configuration automation tools should be employed. This ensures the system is always meeting your baseline “desired state”.
Nutanix ensures this for its CVM and AHV hypervisor using a tool we’ve developed called SCMA which is covered later in this section.
Data is at the core of any business and is arguably the company’s most valuable asset. When thinking of security we need to focus on ensuring data accessibility, quality, and theft avoidance.
On the concept of accessibility, we constantly need access to systems and data to make decisions. One recent method of attack called ‘Ransomware’ threatens the ability to access data by encrypting the data and then ransoming the user to get access back. This can be avoided in a variety of methods, but also highlights to importance of backups.
Data quality is also a critical item since a lot of decisions or actions are depending on this. For example, an attacker could get access to a system and place malicious orders or update shipping addresses diverting goods to his location. This is where logging and checksumming can be very critical to ensure data remains clean.
Last but not least is how do we secure or harden the data. This is typically done using encryption which renders the data useless if they don’t have the keys to decrypt the data. In this case if someone were to steal an encrypted file or disk device, they would be unable to get access to the underlying data.
The network is the typically communication vector attackers use to gain access to systems. This includes things like perimeter security (e.g. external firewalls) and internal intrusion prevention / detection.
Like any good design there should always be layers of security; the same holds true with the network. We need to segment our high-security networks from our trusted networks and secure those from our untrusted networks (e.g. business / wifi networks). It is never safe to assume your local network in the office is secure.
By having multiple layers of the network we can ensure someone who gains access our most untrusted network has a more difficult time working towards our secure networks. During this process a good IDPS system can detect access anomalies or scanning tools like nmap.
Authentication is all about authenticating a users identity against a trusted source of truth like Active Directory or any other IDP (Identity provider). Tools like MFA (multi-factor authentication) or 2FA add additional assurance the user is who they’re trying to authenticate as.
Once the identity has been verified the next piece is to determine what they are authorized to do or what they can access; this is the authorization piece. User foo is authorized to perform x,y on bar and y,z on bas.
Compliance is typically something people refer to when looking at certain accreditations like PCI, HIPAA, etc. However this extends further into ensure compliance with any hardening guide or standards that have been set. For example, the STIG is a sample hardening baseline, however each company may have additional policies / rules in place. In order to ensure a secure system, we must make sure our systems meet these policies and are in a compliant state.
Traditionally compliance is checked retroactively and is a fairly manual process. We believe this is absolutely the wrong approach. Compliance is something we must constantly ensure as that’s the only way we can make sure we limit any potential threat vectors, or close any that may have been opened.
Tools that handle configuration management automation (aka desired state configuration - DSC) are a critical piece here. These will ensure our configuration / settings is always set to our baseline or desired state.
Monitoring and penetration testing are critical to validate and ensure this compliance. Tools like Nessus, Nmap or metasploit can be used to to test the security of a system. During these tests monitoring and detection systems should detect these and alert.
In any system, the people are traditionally the weakest link. In order to ensure users aren’t prone to phishing attacks or social manipulation, training and education is critical. We must ensure that users know what to look for, and to escalate to a known resource if they are unsure.
One method of education is actually simulating phishing attacks so they can start to question things and learn what to look for. We must also enforce other policies like not leaving their computer unlocked or writing down their passwords.
Nutanix has the following security certifications / qualifications across portions of the stack (on and off premise):
Nutanix Security engineering now provides customers with the ability to evolve from point-in-time security baseline checking to a continuous monitoring/self-remediating baseline to ensure all CVM/AHV hosts in a cluster remain baseline compliant throughout the deployment lifecycle. This new innovation checks all components of the documented security baselines (STIGs) , and if found to be non-compliant, sets it back to the supported security settings without customer intervention. SCMA is enabled by default so no action is necessary to enable.
The SCMA will run on the configured schedule (Default: HOURLY), however it is also possible to run this on-demand. To run the SCMA tool you can execute the following command from the CVM(s):
###### Run on a single CVMsudo salt-call state.highstate###### Run on all CVMs
allssh "sudo salt-call state.highstate"
The Nutanix Command Line Interface (NCLI) allows customers to control various configuration settings to enable more stringent security requirements.
The following commands have been added to NCLI to support cluster-wide configuration of the SCMA policy. The list below gives all commands and functions:
Get CVM security settings
ncli cluster get-cvm-security-config
This command outputs the current cluster configuration. The default output will display:
Enable Aide : false
Enable Core : false
Enable High Strength P... : false
Enable Banner : false
Enable SNMPv3 Only : false
Schedule : DAILY
Each of these is defined below:
Set CVM login banner
This command enables or disables the Department of Defense (DoD) knowledge of consent login banner when logging in to any Nutanix CVM.
ncli cluster edit-cvm-security-params enable-banner=[yes|no] #Default:no
By default the DoD knowledge of consent login banner is used. To utilize a custom banner follow the following steps (run as the Nutanix user on any CVM):
Set CVM password strength
This command enables or disables high-strength password policies (minlen=15,difok=8,remember=24).
ncli cluster edit-cvm-security-params enable-high-strength-password=[yes|no] #Default:no
Set Advanced Intrusion Detection Environment (AIDE)
This command enables or disables the AIDE service to run weekly.
ncli cluster edit-cvm-security-params enable-aide=true=[yes|no] #Default:no
Set SNMPv3 only
This command enables or disables SNMPv3 only traps.
ncli cluster edit-cvm-security-params enable-snmpv3-only=[true|false] #Default:false
Set SCMA schedule
This command sets the frequency at which SCMA runs.
ncli cluster edit-cvm-security-params schedule=[HOURLY|DAILY|WEEKLY|MONTHLY] #Default:HOURLY
The following commands have been added to NCLI to support cluster-wide configuration of the SCMA policy. The list below gives all commands and functions:
Get hypervisor security settings
ncli cluster get-hypervisor-security-config
This command outputs the current cluster configuration. The default output will display:
Enable Aide : false
Enable Core : false
Enable High Strength P... : false
Enable Banner : false
Schedule : DAILY
Set hypervisor login banner
This command enables or disables the Department of Defense (DoD) knowledge of consent login banner when loging in to any Nutanix hypervisor.
ncli cluster edit-hypervisor-security-params enable-banner=[yes|no] #Default:no
Set hypervisor password strength
This command enables or disables high-strength password policies (minlen=15,difok=8,remember=24).
ncli cluster edit-hypervisor-security-params enable-high-strength-password=[yes|no] #Default:no
Set Advanced Intrusion Detection Environment (AIDE)
This command enables or disables the AIDE service to run weekly.
ncli cluster edit-hypervisor-security-params enable-aide=true=[yes|no] #Default:no
Set SCMA schedule
This command sets the frequency at which SCMA runs.
ncli cluster edit-hypervisor-security-params schedule=[HOURLY|DAILY|WEEKLY|MONTHLY] #Default:HOURLY
Cluster lockdown is the ability to disable password based CVM access and/or only allow key based access.
The cluster lockdown configuration can be found in Prism under the gear menu:
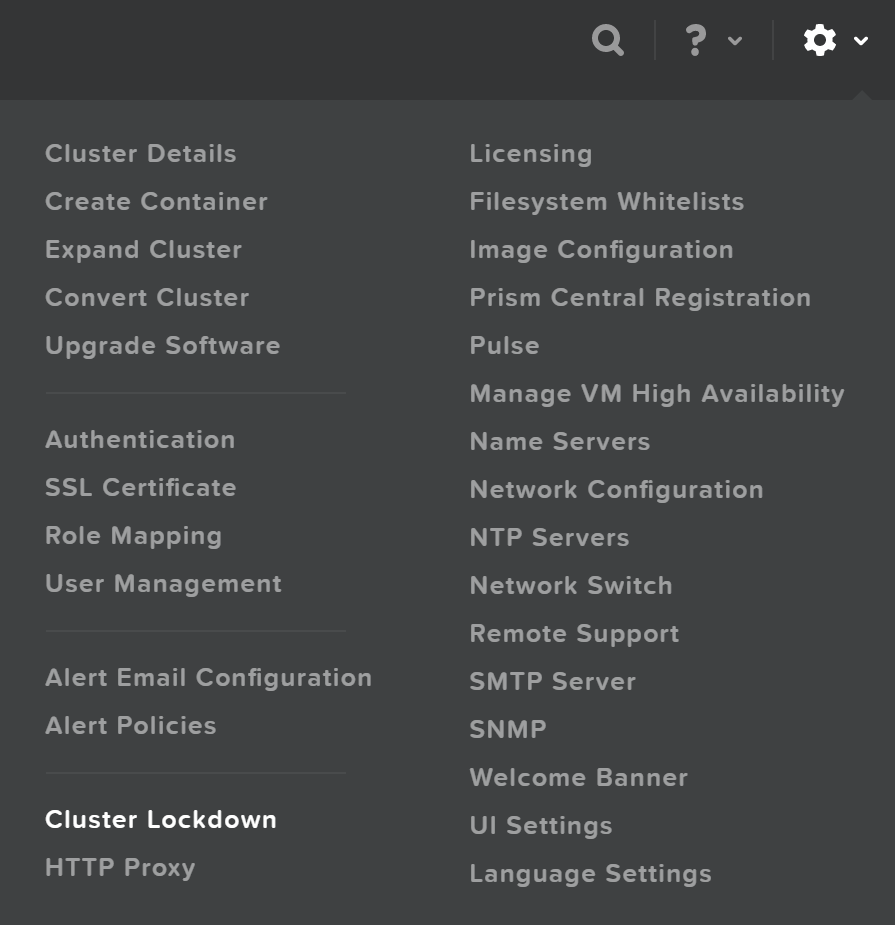 Cluster Lockdown Menu
This will show the current configuration and allow you to add/remove SSH keys for access:
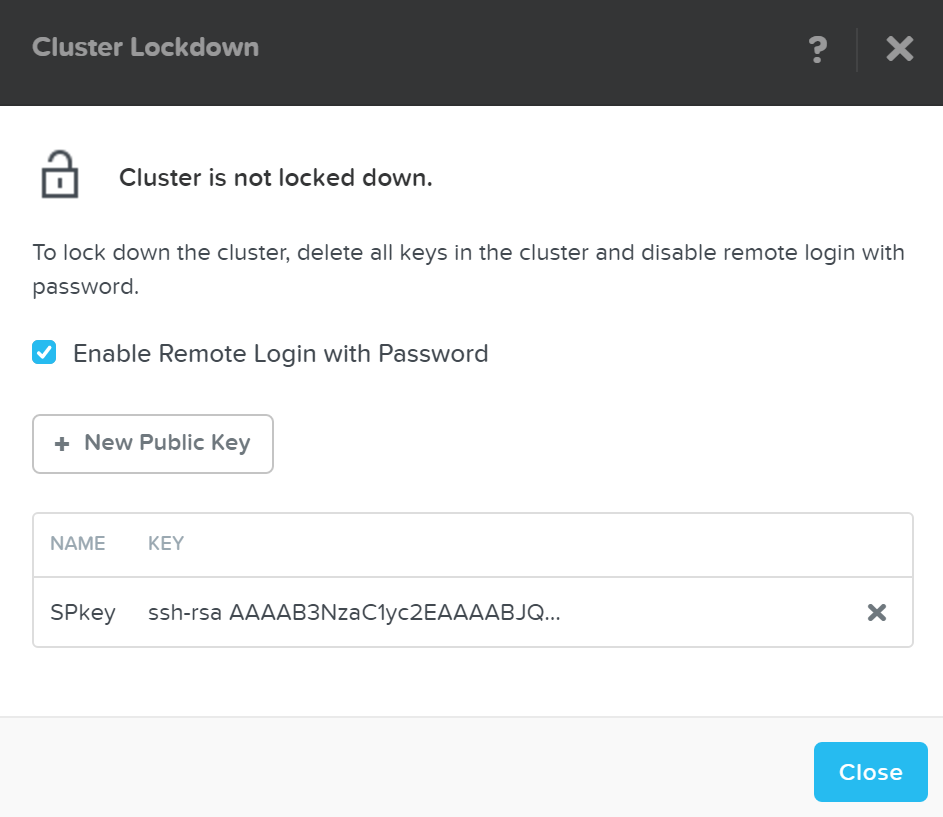 Cluster Lockdown Page
To add a new key click on the ‘New Public Key’ button and enter the public key details:
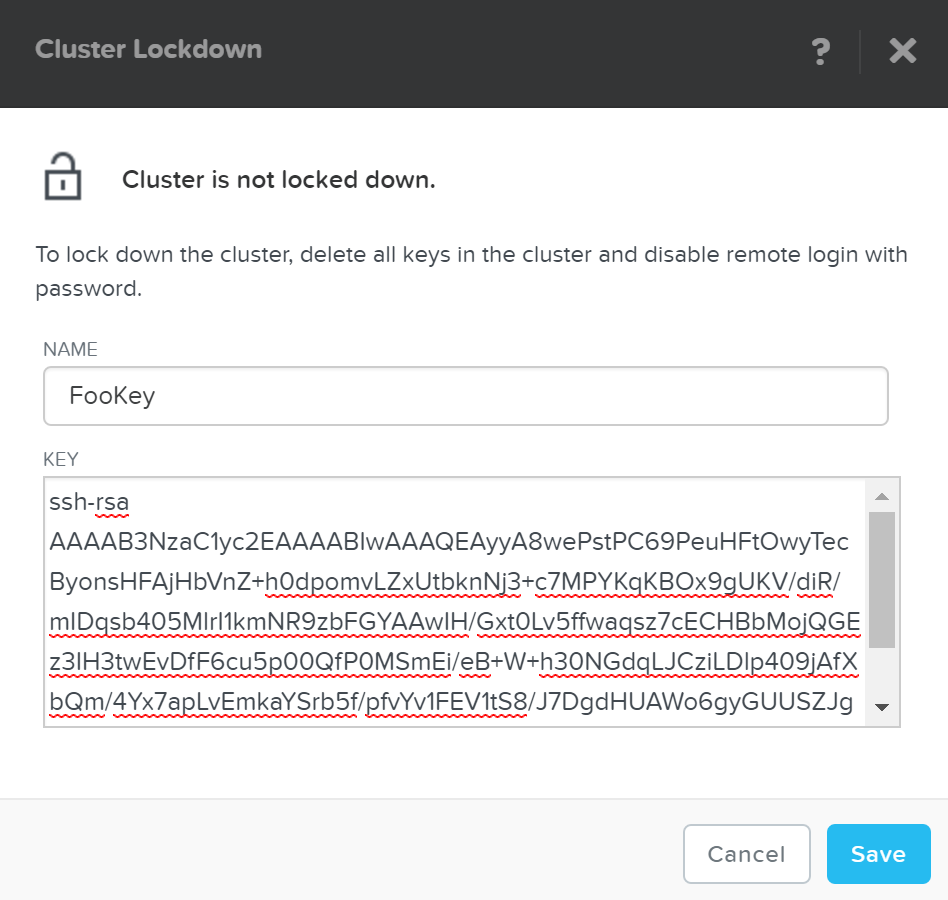 Cluster Lockdown - Add Key
To generate a SSH key, run the following command:
ssh-keygen -t rsa -b 2048
This will generate the key pair which creates two files:
Once you’ve added some key(s) and have validated access with them, you can disable password based login, by un-checking ‘Enable Remote Login with Password.’ A popup will appear to confirm the action, click ‘Ok’ to proceed with lockdown.
In AOS 7.3 Nutanix introduced support for disabling Bash shell SSH access. This helps to reduce the attack surface and disables external SSH access to the CVM and AHV with Bash. For any internal traffic (ie: CVM to CVM or Host to CVM) where SSH might be needed by internal services or processes, port 22 is routed through an envoy proxy. This routing adjustment is done automatically as part of disabling SSH access.
For more information, visit the official SSH Bash Shell Access FAQ KB-20212.
Data encryption is a method that allows parties to encode data in a manner that only those who are authorized can make sense of the data, making it unintelligible for anyone who is unauthorized.
For example, if a message needs to be sent to one person and one person only, the message (plaintext) can be encrypted with a cipher (key) and send them the encrypted message (ciphertext). If this message is stolen or intercepted the attacker can only see the ciphertext which is mostly useless without having the cipher to decipher the message. Once the desired party has received the message they can decrypt the message using the key we have given them.
There are a few main methods of encrypting data:
NOTE: PGP (or GPG) uses both a symmetric and asymmetric key.
When data encryption is talked about it is normally done so in two main contexts:
With Native software-based encryption (with or without SEDs) Nutanix solves for both in-transit* and at-rest encryption. With SED only based encryption Nutanix solves for at-rest data encryption. *NOTE: In-transit encryption is currently applicable within a Nutanix cluster for data RF.
The following sections will describe how Nutanix manages data encryption and its key management options.
Nutanix provides data encryption via three main options:
This encryption is configured at either the cluster or container level, and is dependent on the hypervisor type:
NOTE: for deployments using SED based encryption, this will be cluster level as the physical devices are encrypted themselves.
You can view the encryption state of the cluster by navigating to ‘Data-at-Rest Encryption’ in the settings menu (gear icon). This will provide the current status and allow you to configure encryption (if not currently enabled).
In this example we can see that encryption is enabled at the cluster level:
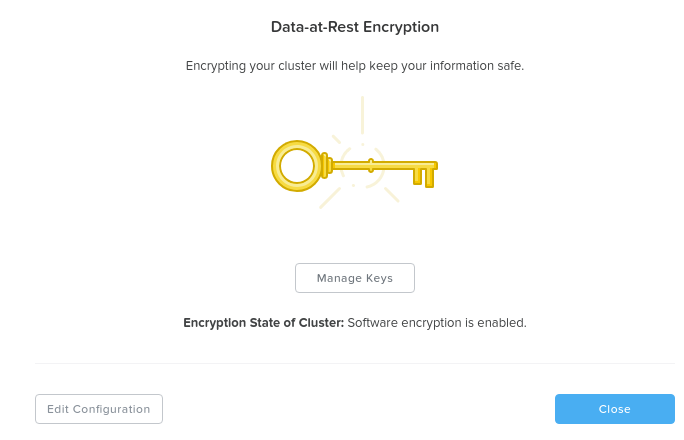 Data Encryption - Enabled (cluster level)
In this example encryption is enabled for particular containers which are listed:
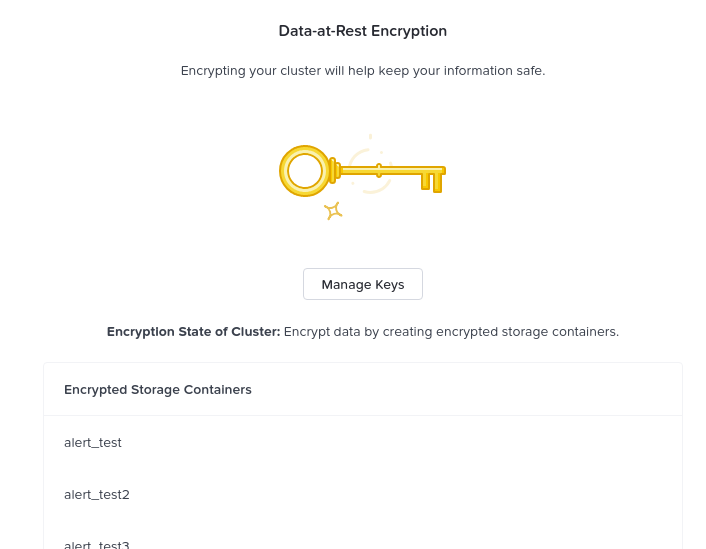 Data Encryption - Enabled (container level)
You can enable / modify the configuration by clicking the ‘edit configuration’ button. This will bring up the menu to configure the KMS used for encryption or the type of KMS currently being leveraged:
 Data Encryption - Configure
For external KMS the menus will guide your through the CSR request process which you can then give to your CA for signing.
Nutanix software encryption provides native AES-256 data-at-rest encryption. This can either interact with any KMIP or TCG compliant external KMS server (Vormetric, SafeNet, etc.) or the Nutanix native KMS introduced in 5.8 (more on this below). For encryption / decryption the system leverages the Intel AES-NI acceleration to minimize any potential performance impact of doing this in software.
As data is written (OpLog and Extent Store) the data is encrypted before it is written to disk at the checksum boundary. This also means that data is encrypted locally and then the encrypted data is replicated to the remote CVM(s) for RF.
Encryption is the last transform applied to data before it is written to disk:
 Data Encryption - Transform Application
Since we encrypt the data after we've applied any deduplication or compression, we ensure that all space savings from those methods are maintained. Put simply, deduplication and compression ratios will be the exact same for encrypted or non-encrypted data.
When data is read we will read the encrypted data from disk at the checksum boundary, decrypt and return the data to the guest. By doing [de/en]cryption at the checksum boundary we ensure no read amplification occurs. Given we are leveraging the Intel AES NI offload, we’ve seen very little impact to performance / latency.
The figure shows a high-level overview of the architecture:
 Data Encryption - SED
SED encryption works by splitting the storage device into “data bands” which can be in an secured or un-secured state. In the case of Nutanix, the boot and Nutanix Home partitions are trivially encrypted. All data devices and bands are heavily encrypted with big keys to level-2 standards.
When the cluster starts it will call out to the KMS server to get the keys to unlock the drives. In order to ensure security no keys are cached on the cluster. In the event of a cold boot and IPMI reset, the node will need to make a call back to the KMS server to unlock the drives. Soft reboots of the CVM will not force this to occur.
Nutanix provides native key management (local key manager - LKM) and storage capabilities (introduced in 5.8) as an alternative to other dedicated KMS solutions. This was introduced to negate the need for a dedicated KMS solution and simplify the environment, however external KMS are still supported.
As mentioned in the prior section, key management is a very crucial piece of any data encryption solution. Multiple keys are used throughout the stack to provide a very secure key management solution.
There are three types of keys used in the solution:
The following figure shows the relationships between the various keys and KMS options:
 Data Encryption - Key Management
The local key manager (LKM) service is distributed among every Nutanix node and runs natively on each CVM. The service uses a FIPS 140-2 Crypto module (under certification), and key management is transparent to the end-user besides doing any key management activities (e.g. re-key, backup keys, etc.).
When configuring data encryption, the native KMS can be leveraged by selecting ‘Cluster’s local KMS’:
Data Encryption - Configure
The master key (MEK) is split and stored across all nodes in the cluster leveraging Shamir’s Secret Sharing algorithm to allow for resiliency and security. A minimum of ROUNDUP(N/2) nodes must be available to re-construct the keys, where N = number of nodes in the cluster.
Once encryption has been enabled, it is recommended to take a backup of the data encryption key(s) (DEK). If a backup is taken, it must be secured with a strong password and stored in a secure location.
The system provides the ability to rotate (re-key) both the KEK and MEK. It automatically rotates the master key (MEK) every year, however, this operation can also be done on demand. In the event of a node add/remove, we also rotate the master key.
©2025 Nutanix, Inc. All rights reserved. Nutanix, the Nutanix logo and all Nutanix product and service names mentioned are registered trademarks or trademarks of Nutanix, Inc. in the United States and other countries. All other brand names mentioned are for identification purposes only and may be the trademarks of their respective holder(s).